Last updated on April 21st, 2024
This site is reader-supported. When you buy via links on our site, we may earn an affiliate commission at no extra cost to you.
Physical DVDs have long been a popular format for storing movies, TV shows, and cherished memories. However, the fragility of these discs and the inconvenience of carrying them around have led many to seek a more practical solution – backup a DVD.
This article serves as your guide to understanding the various backup formats, quality considerations, and best practices (with a step-by-step guide) for backing up your DVD collection in the digital age.
Backup Formats: Which One to Choose?
When creating DVD backups, you have several format options to consider. The choice depends on your needs and preferences:
1. ISO Image
This format is an exact replica of the DVD, including menus and extras. It’s ideal for archiving and preserving the original structure, more guide here.
2. Video Files (e.g., MP4, MKV, etc.)
Video files provide flexibility for playing on various devices. They are great for watching movies and TV shows without the hassle of menus and extras. Check out the DVD to mp4 converters.
3. VOB Files
VOB files are the native format of DVDs. They are useful for retaining the original DVD structure (DVD duplication) and can be played with a DVD player. Else, you may need to convert VOB to MP4 format.
Quality Considerations
Maintaining the quality of your DVD backups is crucial for an enjoyable viewing experience. Here are the main criteria that you need to consider:
- Resolution: Choose a resolution that matches the original DVD quality. For standard DVDs, 480p is typically sufficient, while Blu-ray discs require 720p or 1080p.
- Bitrate: Higher bitrates result in better video quality but also lead to larger file sizes. Adjust the bitrate to find the right balance between quality and storage space.
- Audio Quality: Preserve the audio quality by selecting a suitable audio codec and bit rate. For most DVDs, AAC or AC3 codecs work well.
- Subtitles: If your DVD contains subtitles, make sure to include them in your backup for a complete viewing experience.
- Aspect Ratio: Maintain the original aspect ratio to prevent distortion. For widescreen DVDs, the aspect ratio is typically 16:9.
Best Practices for Creating DVD Backups
To ensure successful and efficient DVD backups, follow these best practices:
1. Use Reliable Software
Choose reputable DVD backup software that supports a variety of formats and offers customization options.
2. Check for Copyright Protection
DVDs may have copy protection. Use software that can bypass or handle such copy-protection
3. Organize Your Backups
Keep your backups organized with clear naming conventions and directory structures on your computer.
4. Test Your Backups
Verify the quality of your backups by watching them to catch any issues early on.
5. Store Backups Safely
Keep your digital DVD backups on reliable storage devices, such as external hard drives or cloud storage services.
How to Backup a DVD with a Reliable Software?
In the market, there are many software that you can use to backup a DVD, some of them are freeware while the more reliable programs are shareware.
Software #1: WinX DVD Ripper Platinum (WIndows or Mac)
WinX DVD Ripper Platinum is a popular DVD ripping software that stands out for its ease of use, speed, and versatility. With support for various DVD types, including homemade and copy-protected DVDs, it enables you to convert your DVDs into a digital format, making them compatible with a wide range of devices.
Additionally, WinX DVD Ripper Platinum offers excellent output quality and numerous customization options to tailor your backups to your preferences. For a complete guide, follow the steps below.
Steps to Backup a DVD Using WinX DVD Ripper Platinum
Before you can use the software, make sure you already download and install the software. Then, insert a DVD to backup into your computer DVD drive.
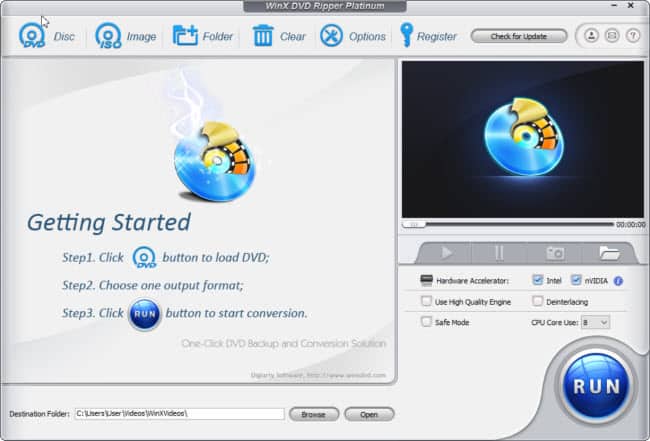
Step 1: Launch WinX DVD Ripper Platinum
To launch the software, just double-click on the WinX DVD Ripper Platinum icon on the desktop. You’ll be greeted with a clean and intuitive user interface.
From the screen, you can click on the “DVD Disc” option to backup a DVD. A new pop-up will ask you to “select the source dvd drive”. Just choose the correct drive and click on the “OK” button.
Step 2: Select the Output Profile
Once the dvd content is loaded you will see an “Output Profile” window displayed.
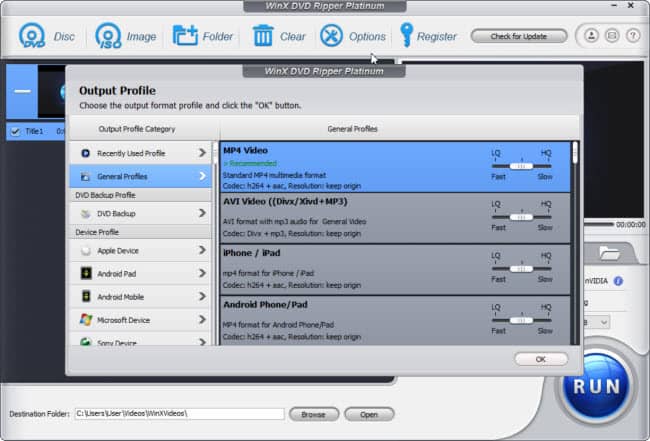
WinX DVD Ripper Platinum offers a variety of presets for different devices and formats. For instance, you can choose “MP4 Video” under the “General Profiles” category to create a backup that’s compatible with most devices. Then, click on the “OK” button.
Usually, the software will auto-detect the title to rip and you also have the option to change the video quality from LQ to HQ in the slider (right-hand side).
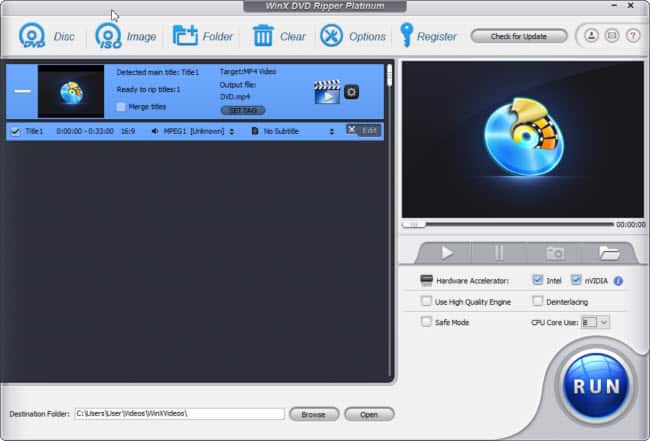
Step 3: Customize Output Settings (Optional)
If you want to fine-tune the backup, you can click the “Gear” button to adjust parameters like video codec, bit rate, aspect ratio, resolution, and more. This step is optional but can be useful if you have specific requirements.
Step 4: Choose a Destination Folder (Optional)
At the bottom “Destination Folder:” area, click the “Browse” button to specify the destination folder in your hard drive where you want to save the backup file.
Step 5: Start the Ripping
Finally, click the “RUN” button to begin the ripping process. WinX DVD Ripper Platinum will start converting the DVD into the selected format.
Once the ripping is complete, you’ll find the backup file in the specified destination folder. You can now enjoy your content on various devices and store it safely for the long term.
Software #2: HandBrake (WIndows, Mac, or Linux)
HandBrake is an open-source and widely-used software application for video transcoding, which means it can convert a DVD into a digital video file format.
This allows you to create a digital backup of your DVD on your computer or other storage devices, making it easier to watch your content without needing the physical disc. Here’s a step-by-step guide on how to use HandBrake for DVD backup:
Please note: When using HandBrake to back up a DVD, make sure that you are complying with copyright laws and only create backups of DVDs that you own and for personal use.
The Steps to Backup a DVD Using HandBrake
As usual, start by downloading and installing HandBrake from the official website (https://handbrake.fr/). The software is available for Windows, macOS, and Linux. Then, insert the DVD you want to back up into your computer’s DVD drive.
Note: You may need to install Microsoft .NET Desktop Runtime in order for the HandBrake software to work perfectly on your computer.
Step 1: Open HandBrake
Launch the HandBrake software and you will see the interface below. You need to choose a source file to rip.
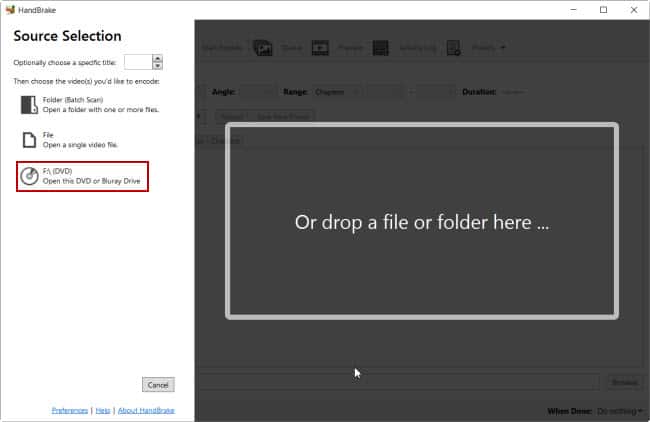
Step 2: Source Selection
On the left panel, click on the F:\ (DVD). HandBrake will scan and read the contents of the DVD. You will see the preview on the screen.
If your DVD has more than a video title, use the “Title:” drop-down menu to choose the correct title to backup.
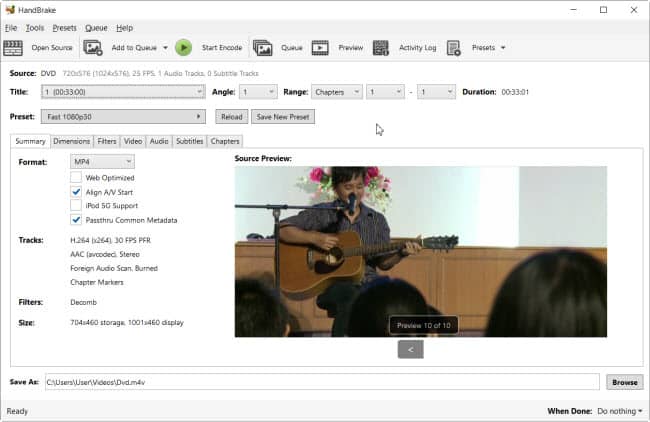
Step 3: Choose a Preset
HandBrake offers various presets for different output formats and devices. You can choose from the “Preset:” drop-down menu that matches your requirements (to play the video on the intended device).
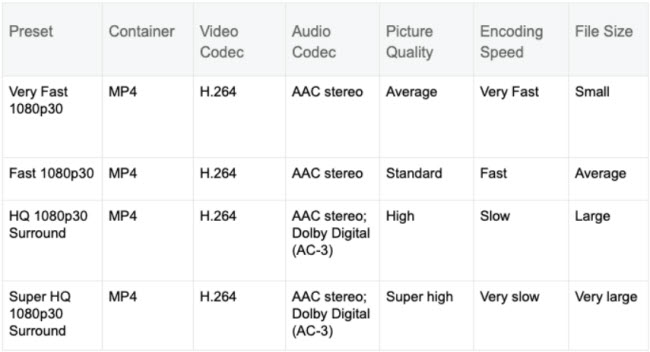
You can select a preset for a specific video format or a preset optimized for a particular device, like an iPhone or Android tablet.
Step 4: Adjust Settings (Optional)
If you’re more experienced with video encoding, you can further customize your settings, such as video quality, audio settings, and subtitles by clicking the “Video,” “Audio,” and “Subtitles” tabs.
Step 5: Destination Settings (Optional)
In the “Save As:” at the bottom of the screen, click on the “Browse” button and choose where you want to save the backup file. You can specify a file name and location on your computer.
Step 6: Start Encoding
After selecting your preferences, click the “Start Encode” button. HandBrake will start converting the DVD content into digital format.
The backup process may take some time, depending on the length and quality of the DVD content. Once the process is complete, you will have a digital backup of your DVD in the format you specified.
HandBrake is a versatile tool for backing up DVDs, and it provides various settings and options for those who want to fine-tune their backups. Just ensure that you use the software responsibly and in compliance with applicable copyright laws and regulations.
Conclusion
Creating DVD backups offers a great solution to protect and access your DVD content with ease. By understanding the backup formats, quality considerations, and best practices, you can confidently safeguard your favorite movies, TV shows, and personal memories for years to come.
Whether you choose to duplicate the DVD or optimize the content for digital platforms, the choice is yours, and the benefits are clear: convenience, preservation, and peace of mind.
This article shows the step-by-step on how to backup a DVD using different software. WinX DVD Ripper Platinum is an ultimate option while you also can use the free HandBrake. Remember to respect copyright laws and ethical considerations when creating backups of commercial DVDs.