Last updated on April 12th, 2024
This site is reader-supported. When you buy via links on our site, we may earn an affiliate commission at no extra cost to you.
DVD copy protection is a broad term that covers various DVD copy protection methods. These methods include DRM, CD/DVD checks, dummy files, DVD oversize and overburn, invalid table of contents, physical errors, or bad sectors.
But do you know how to remove copy protection from DVDs? If you want to remove copy protection from DVDs, simply search for DVD copy protection software online, and you will get millions of results.
To put it bluntly, although DVD copy protection software is developing at a fast pace, many tools are poorly designed and perform poorly.
To help you stay out of the web of such a tool, we’ve put together five great DVD copy protection softwares to remove encryptions from DVDs that work as promoted.
How to Remove Copy Protection from DVDs?
If your DVDs are protected regionally, you can avoid prevalent DVD copy protection as well as encryption plans using the most suitable DVD copy protection removal tools.
In addition, such tools will come in handy in case you need to save your DVDs from illegal copying. For this, you can choose a several types of tools to remove copy protection from DVDs.
Choosing any tool from this article to take benefit of such copy protection techniques as Dummy Files, CD/DVD-checks, DRM, over-burning and oversizing the DVDs, unfair table of contents, bad sectors, or physical errors.
So, let’s now know how to remove copy protection from DVDs using the software.
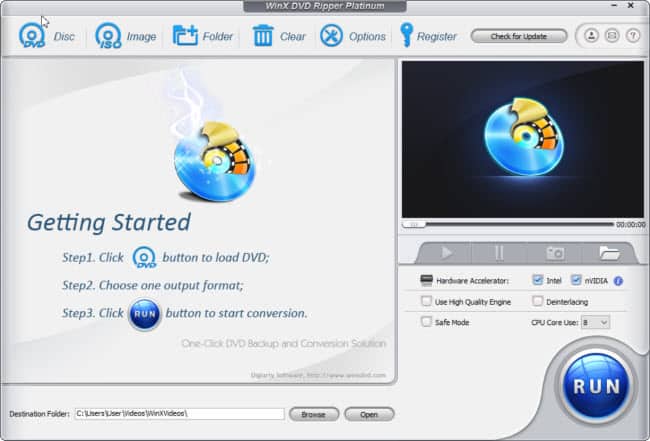
1. Using a Best DVD Ripping Software: WinX DVD Ripper Platinum
The WinX DVD Ripper Platinum is a Windows-based DVD ripping software. It can rip any DVD to a hard drive, like rip DVDs to H.264, MP4, AVI, MPEG, HEVC, M2TS, MOV, and many other formats.
This software also converts DVDs on Apple (iPad, iPhone, iTunes, Apple TV) for playback, Android (Huawei, Samsung, Kindle, Nexus), Microsoft (Surface, Windows Phone, Xbox), and Sony, as well as allows you to copy DVD to NAS drive, Plex Media Server, etc.
It supports all homemade and commercial DVDs. The beauty of this program is that it’s able to remove region codes and all kinds of copyright protections like CSS, RCE, UOP, etc.
The Program’s Main Features
- Convert all DVDs to formats like MOV, MP4, AVI, 3GP, WMV, FLV, etc.
- Clone any DVD content to the VIDEO_TS folder and ISO image
- Automatically remove the DVD copy protections and rip it
- Convert region-protected DVD to a region-free file
- Convert VIDEO_TS folder and ISO image to mainstreaming formats such as MP4
- Comes with basic editing functions like trimming & cropping movies
- Extract audio-only from DVDs to formats like AAC, MP3, and AC3
Official page: https://www.winxdvd.com/dvd-ripper-platinum/
Step-By-Step Guide to Use The Ripper
Here is how to use WinX DVD Ripper Platinum to remove the DVD copy protections on Windows 10/11:
Download and install the WinX DVD Ripper Platinum. After installation, insert the DVD disc to rip and you can launch the WinX DVD ripper software and you’ll see the main interface.
Step 1: Input Source DVD
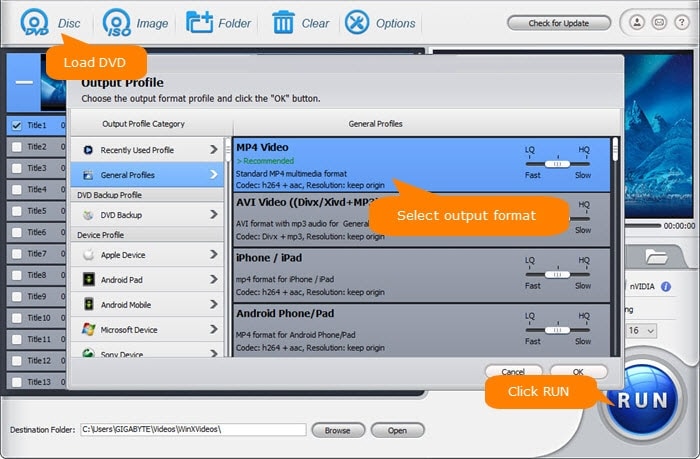
- Click on the “DVD Disc” button on the top left menu of the screen.
- A dialogue box will appear asking you to select the source dvd disc.
- Choose the DVD drive and click the “OK” button. The program will load the disc and pop up another screen to select the output profile.
Step 2: Choose the Output File Format
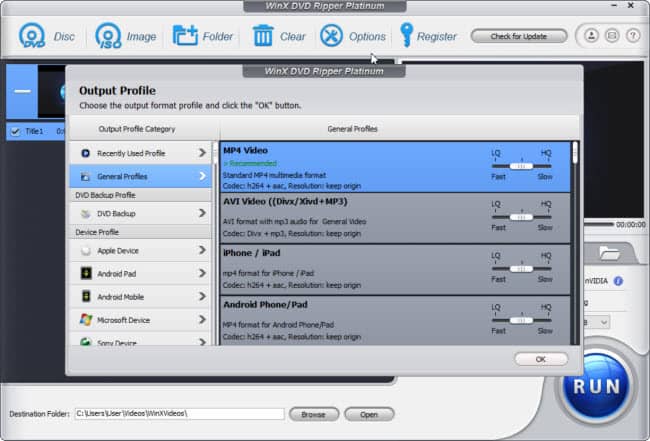
- From the screen, there are many other selections provided, including General profiles, DVD backup profile, device profile, web video profile, etc.
- You can choose any device model or format under the corresponding type as the output format as per your requirements, such as MP4 Video. Then, click the “OK” button.
Step 3: Run to Rip Movie from DVD
- If you want, you can change the “Destination Folder:” location to a new folder.
- When ready, just click on the “RUN” button to begin the DVD ripping. After completing the process, the destination folder saving will open. You can immediately play it or transfer it to an iPad, iPhone, or Android device for playback.
2. Using a Budget DVD Ripper: Wonderfox DVD Ripper Pro
Wonderfox DVD Ripper Pro comes with many things in common with the WinX DVD Ripper Platinum software, both can remove copy protection from DVDs. It even swears to rip audio and video files in any preferred format at a fast speed.
The software is relatively easy-to-use even for beginners and of course, for advanced users. You can get your DVD ripped by simply loading it, choosing the output format, and pressing the “RUN” button.
Wonderfox helps its users effectively remove DVD copy protection, supporting nearly every DVD encryption, skipping RCE, CSS, etc. It’s even smart enough to capture and read a video meta-title to help in the perfect organization.
The Notable Features
- Supports maximum encrypted DVDs (including classic & latest DVDs)
- It has various preset output files for smartphones and gadgets files, PC, TV, Xbox, and more. Rip extensive DVD to almost any device, video or audio.
- Supports 1:1 copy from DVD discs including subtitles & audio.
- Practical video editing works like cropping, cutting, and some special effects.
- Support 300+ output formats, and can rip the DVD to a DVD folder & ISO image too.
- Let’s compress a DVD (up to 7.5 GB) to a digital video (1 – 2 GB) with the original quality undamaged.
- Budget software that can download the free trial to test and support the latest Windows 11/10.
Official page: https://www.videoconverterfactory.com/dvd-ripper/
The Steps to Use the Wonderfox DVD Ripper Pro
Here are the steps that you can follow to easily rip copy-protected DVDs using the WonderFox DVD Ripper Pro:
1. Download and install the WonderFox DVD Ripper Pro on the PC. Also, insert your DVD that needs to be copied to the computer DVD drive.
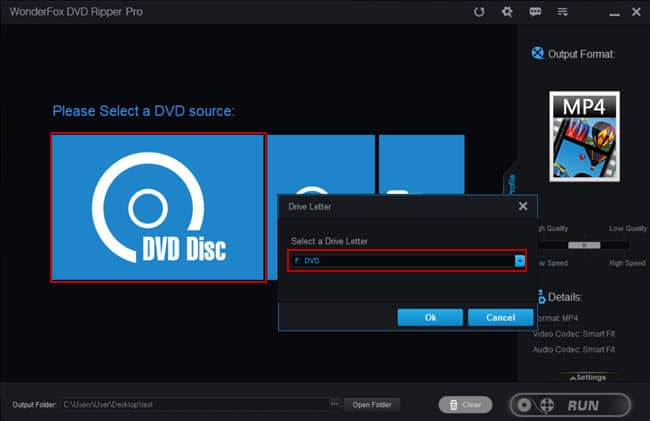
2. Launch the software and you’ll see a rather neat interface. Choose the ”DVD Disc” as the DVD source. This will pop up a new dialog box asking to select a DVD drive. Choose your DVD drive and click on the “Ok” button.
3. This will load the DVD content and display it on the screen. The WonderFox DVD Ripper Pro software will choose the main movie for you to rip.
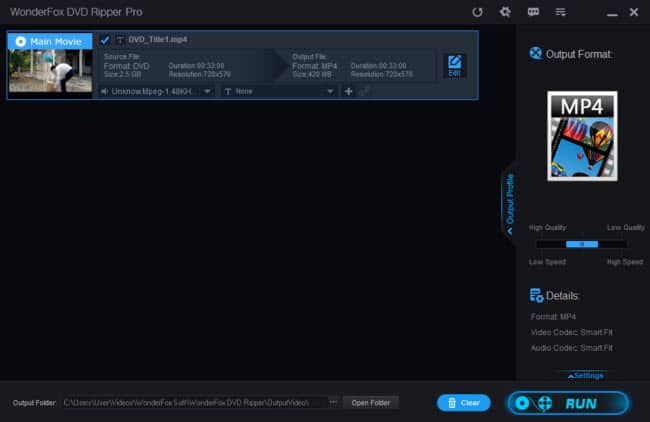
4. On the application’s right-hand side, click on the “Output Format:” and a huge selection of output audio/video formats will then pop out. Click on the “Video” category and choose the output format, like MP4, AVI, MKV, WMV, MPG, MOV, M4V, MTS, etc.
5. [Optional] Click on the “Settings” button if you want to change the audio/video settings; also can change the “Output Folder:” to change the location to store the ripped files.
6. Then, all you need to accomplish is to click on the “RUN” button to start the ripping. After that, the application will finish the ripping operation.
3. Using a Best DVD Copier – DVDFab DVD Copy
The DVDFab DVD Copy has been on the market for some time. In case you require DVD copying or cloning then this DVDFab software provides outstanding results quickly. That’s why we also highlight this software as one of the best DVD copy protection removal software.
DVDFab DVD Copy is equipped with the latest technology so that it can offer quick copy speed, appropriating as low as 10 minutes for a DVD (but it depends on the original video length) with lossless quality output.
For core copying of DVDs, DVDFab is difficult to beat, delivering more advanced settings and different copy modes than most opponents. That’s why our editor rated this software as the best DVD copy software in our reviews.
The Key Features
- It has 6 modes to copy the DVDs.
- You can save the output to another DVD disc, DVD Folder, or ISO Image for playback.
- Fast, stable software to copy Blu-ray and DVD discs.
- Cloud decryption services can decrypt the latest DVDs in a cloud server.
- Lossless backup of any DVD to DVD9, or compress it to DVD5.
- Built-in burning engine for better stability.
- Support the latest Windows 11/10 or Mac OS X.
Official page: https://www.dvdfab.cn/dvd-copy.htm
The Step-By-Step Guide
1. First, download the DVDFab from their official site and install it by following their on-screen instructions. Insert a DVD disc to copy into your DVD drive.
2. Launch the software and click on the “Try” button. You also can click on the “Buy Now” button if you haven’t purchased the software. Next, just click on the “Start” button and you should see the following screen.
3. Usually, the software will auto-detect and display the disc content [picture below]. You also can click the “Add” option on the main screen to add the DVD content. In case the source is a folder or an ISO, you can just drag and drop that file into the page.
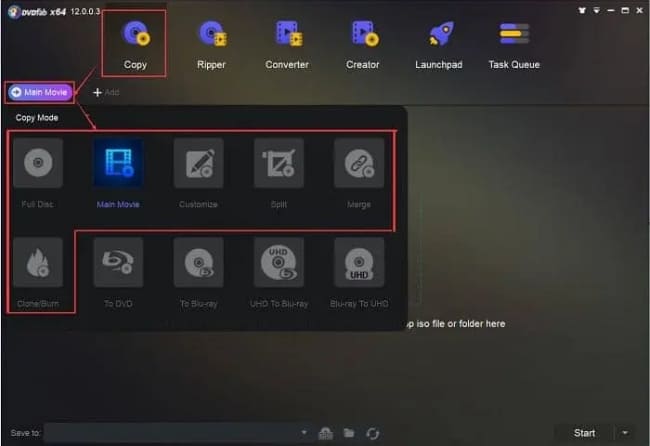
4. In case no disc content is displayed, you need to click on the “Copy” button and you will see the different copy modes available displayed, choose the “Main Movie”.
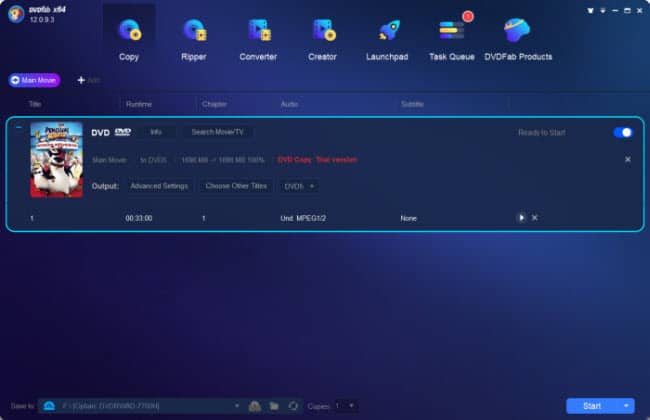
From the screen, you can change some settings by clicking on the “Advanced Settings” button.
5. At the bottom of the screen, you can choose the output folder by clicking on the “Save to:” drop-down dialog box, or save to “ISO Image” or a new folder (and select a new folder location).
6. Start to copy the DVD by clicking on the “Start” button. DVDFab DVD copy will remove the protections automatically and copy the DVD disc.
7. If you want to burn or copy to another disc, your dvd drive will eject and ask you to insert a new disc. Insert a new blank dvd disc and click on the “OK” button to proceed to copy the disc.
4. Using a Best DVD Ripper for Mac – MacX DVD Ripper Pro
The MacX DVD Ripper Pro software is rated as the best DVD ripper for Mac by our editors. It delivers all the functions you require for a clean and fast DVD ripping.
Besides, the quality of output is likewise top rate and the best thing is the software is priced reasonably. The MacX DVD Ripper Pro tool can rip any encrypted or protected DVD and even delivers 1:1 copies.
The program is easy to use which is especially true for computer newbies. The trim & crop features of this tool work competently. It’s ready for many devices and its functionality includes DVD copy, presets, no quality loss, export options, all DVD types, all DRM defeat, and ultimately, high-quality work.
The Software Main Features
- Rip DVD to popular 350+ profiles (video/audio formats) on a Mac.
- Convert DVDs to iPhone, iPad, iPod, Android, Apple TV, and more.
- Sophisticated tech to enhance the ripping speed without losing the quality.
- Update often to rip any encrypted and homemade DVDs.
- Flexible advanced settings for Pro users.
- Built-in video editors like trim, crop, merge and include external subtitles.
- Upload DVD videos to YouTube, Metacafe, Break, Facebook, and more.
- Extract audio and snapshot images from the DVDs
Official page: https://www.macxdvd.com/mac-dvd-ripper-pro/
The Steps to Use the Software
The MacX DVD Ripper Pro allows users to convert, rip, and also back up commercial and home DVDs speedily. So, let’s now follow the step-by-step guide to digitizing & back up the discs.
- Download & install the MacX DVD Ripper Pro software. Support Mac OS X 10.6 and above.
- Insert a disc to rip to your computer DVD/optical drive. Then, follow the steps below:
Step 1: Load the DVD Source
Launch the software; load the DVD by clicking on the “DVD Disc” option. This will pop up another dialog box asking you to choose the DVD drive. Choose the drive and click on the “OK” button. This will load the DVD contents and pop-up an “Output Profile” window.
Note: If you want to load the ISO image simply click on the “ISO Image” option or load the DVD folder by simply clicking on the “Folder” option.
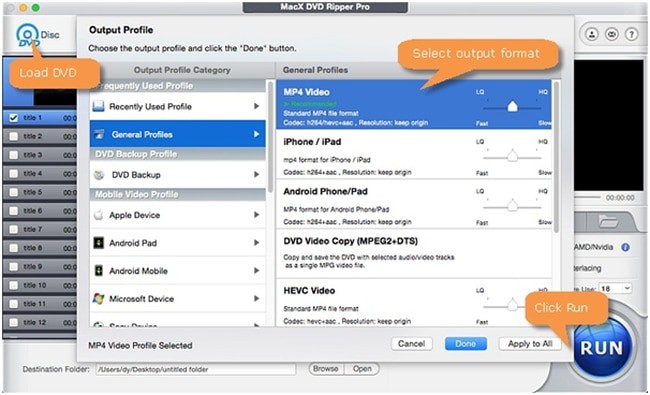
Step 2: Select the Output Audio/video Format
From the “Output Profile” window, choose an output format of your choice. Look in the left-hand panel for category and choose a format. You can select the formats as well as portable devices, such as FLV, MP4, AVI, MOV, MPEG, iPhone, iPod, iPad, Samsung, WP8, HTC, PS4, and so many more. Then, click on the “Done” button.
[Optional] Set the Destination Folder
In the “Destination Folder:” column, click on the “Browse” button, go through the folders on the PC, and choose the folder where you wish to keep the ripped files.
Step 3: Start the Conversion Process
Click the “RUN” button to start the ripping process, you can see the progress of conversion and can cancel the procedure at any time you want.
5. Using Free DVD Copy Protection Removal Tool – HandBrake
The HandBrake tool isn’t for those people who want a complete tool. It’s not easy to use as well as slower as compared to other software recommended above. However, it makes up for the complicacy with unique features in it.
The Handbrake tool lets you rip unprotected DVDs and is a powerful transcoder. This tool packs more qualities than any other software on this list.
Experienced users can operate Handbrake to sharpen, de-interlace, remove, and add subtitles, manipulate frame rates, mix audio tracks, rotate, and also add chapter markers.
Also, Handbrake lets you create files in h265 and h264 codecs. This tool also features multiple presets, therefore, making the whole ripping procedure all the more manageable.
When you think about ripping your DVD to digital formats, Handbrake is the foremost free option that proves to be the best. Nevertheless, if you want to rip encrypted discs with HandBrake, you need to install an extra tool called libdvdcss, and follow the steps below.
The Program Great Features
- Supports multiple output and input formats.
- Include chapter markers
- In-built presets
- Add & remove subtitles
- Batch scanning
- Customize the video before ripping
- Down-mix audio
Official site: https://handbrake.fr
The Step-By-Step Guide to Use HandBrake
Using the Handbrake tool to rip a DVD isn’t a difficult row to hoe. So, let’s now have a peek at the thorough step-by-step guide to learning to remove copy protection from DVDs and rip DVDs using HandBrake.
1. Go to the Handbrake official site to download the installer and install it by following the onscreen instructions.
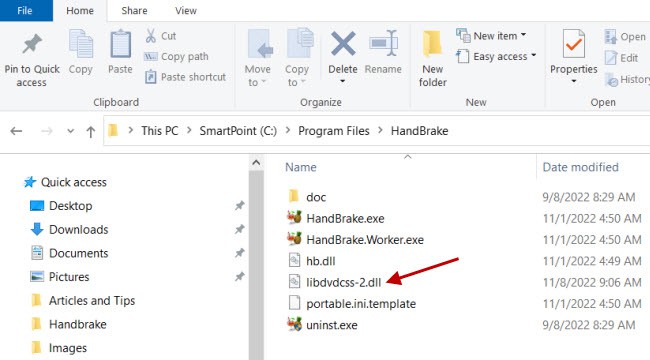
2. In order to rip the encrypted DVDs, you need to download and install the libdvdcss on your computer. Here are the links to download libdvdcss:
Just right-click on the file, and choose “Save Link As” to save the file to your computer. You may see something like “file cannot be downloaded securely”, just click on the arrow next to it and choose “Keep”.
3. Copy the downloaded “libdvdcss-2.dll” file to the location where you install the Handbrake folder, usually, it’s on C:\Program Files\HandBrake. Just click on the “Continue” button if anything pops up. The Handbrake folder will look like this:
4. Then, launch the HandBrake software. You will see the following screen:
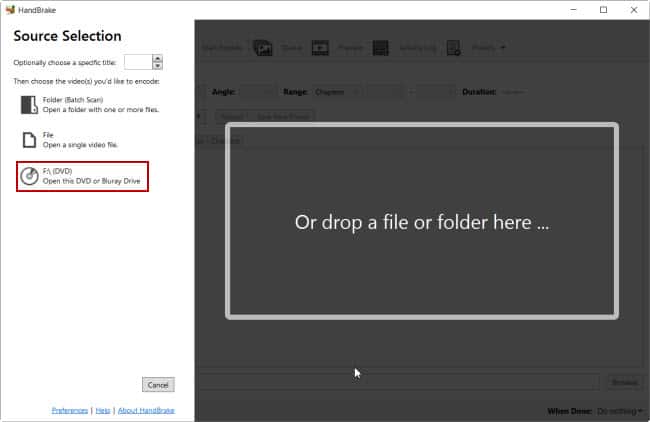
5. On the left panel, click on the F:\ (DVD) or your dvd/optical drive. The software will scan and load the disc contents.
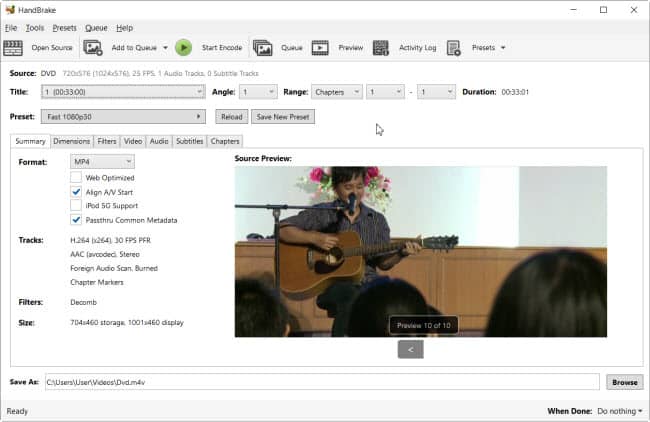
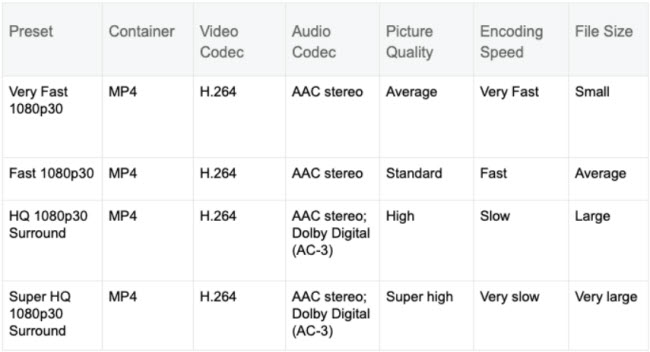
6. In the “Preset:” drop-down menu, choose the most suitable preset that you want the video to play on the device. Else, just leave it unchanged. Here are the popular presets:
7. If you want to adjust the video quality, click on the “Video” tab and adjust the quality by dragging the slider.
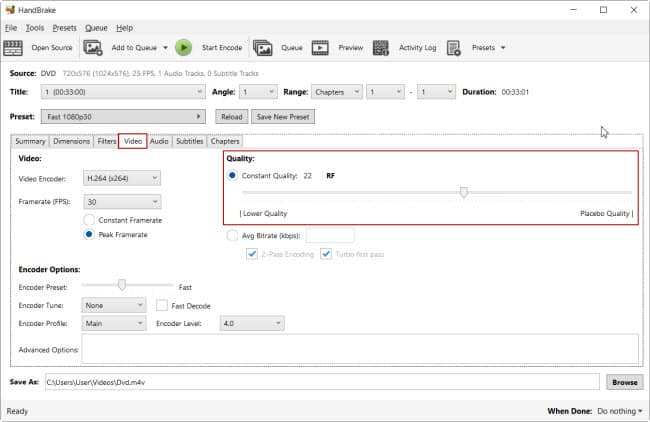
8. To preview the video, click on the “Preview” button. If needed, you can change the destination folder by clicking on the “Browse” button in the “Save As:” column and choosing a new folder.
9. Finally, click on the “Start Encode” button to start copying the DVD. The DVD encryptions will be automatically removed by the software.
The Types of DVD Copy Protections
Many types of DVD copy protection may prevent you from copying the content in a DVD. A few of these types are as follows:
1. Region Code
This generally restricts regions where the content can be played by checking region numbers with the configuration flags in the DVD players.
2. Region Code Enhanced (RCE)
Region Code Enhanced generally refers to the retroactive scheme that prevents playing DVDs from a particular region in some other region. This is also called just “REA” or “RCE”.
3. Content Scramble System (CSS)
Content Scramble System generally refers to a DRM (Digital Rights Management) scheme used on nearly all commercial DVDs out there.
4. User Operation Prohibition (UOP)
User Operation Prohibition generally refers to a DRM scheme used on DVD videos that restricts viewers from committing an action.
Also read: How to Rip Disney DVDs on Windows PC?
5. Sony ARccOS
This protection refers to a particular copy protection scheme developed by the Sony Company to protect the Sony DVD content.
6. Analog Protection System (APS)
Analog Protection System is also known as Copyguard. It generally refers to the prevention system of DVD copy which was initially created by Macrovision.
7. FairPlay
FairPlay is developed by Apple. It is a DRM tech built into an MP4 file as the encrypted AAC (Advanced Audio Coding) audio layer, trying to cover copyrighted works sold via the iTunes Store, as well as it only lets authorized gadgets play the media.
8. Content Protection for Recordable Media (CPRM)
This stands for a tool employed for preventing the copying, deletion, and moving of digital content on a host gadget, such as a PC, or DVD player.
Bottom Line
All these tools are great to remove the copy protection from DVDs and help you rip, or copy the discs without any hurdles.
Of course, there are some free dvd tools in the market but most of them are unable to deal with encrypted discs. Even the HandBrake recommended above also has some drawbacks like slower conversion speed, limited output formats, not being user-friendly, etc.
So, choose according to your need and preferences from our given list. After all, with the paid tools, it’s clean and more powerful while you also can get better customer support.