Last updated on March 24th, 2024
The world revolves around the internet these past few decades; new movies, sports, or any entertainment, you name it. And some only provide live streams that you can’t download. It can be trying to save the live streams of YouTube channels, or maybe you want to keep your Zoom business meetings. So what do you do?
Well, all you have to do is record them. Yes, some applications can help you to record streaming videos from any source. Recording your screen and capturing all the activities on your screen without annoying limitations sounds excellent.
The article will be covering recording live streaming and how you can do it. And help out on how you can use the apps to record your screen and the apps you can use to complete those tasks.
To Record Streaming Videos with Video Capture Software
The video recorder software is easy to use screen recording application for your phone, laptop, or PC. Here are two popular programs for video recording to guide you and help you with your stream recording as you use them.
1. Movavi Screen Recorder (Paid)
With just a click, Movavi Screen Recorder can capture your screen in a second. It is second to none if you plan to record events and online meetings, webinars, streaming videos, video instructions, or tutorials. Our editor’s also rated this software as one of the best recorder for streaming video.
Everyone can agree that the tools we use need to be reliable; it’s just one of the most crucial parts. And at present, it is even more vital to have one, especially with the online classes and meetings that are taking place. Whether it is for studies or work, screen recorders are gaining more in popularity.
So, recording the screen that offers you to watch what you record with audio sounds quite reliable, doesn’t it? With so many available tools on Movavi Screen Recorder, here are some essential features and guides for the app.
The Features of Movavi Screen Recorder
1. Recording
This software can let you to record streaming videos with various settings like:
- Area of capture
It is really easy to select the area you want with the Movavi app. You can either record your screen, select the location manually or a specified program window.
- Frame rate
You can record from 5 to 60 frames per second, and recording with a higher frame rate will leave you with a better quality of video. Of course, this means that it will take up a lot more of the storage space, so you will need to adjust accordingly.
- Audio quality
With the option to choose from mono and stereo, you can also change the frequency of the audio quality.
- Webcam
Yes, you can also record the video on the webcam. You can even pick the size, frame rate, position, and resolution.
- Scheduler
You can consider this feature as a life-saver, especially if you cannot stay in front of your screen. All you have to do is set a timer for the app to begin recording the screen automatically.
2. Screenshot
Movavi offers its users to take screenshots as they record videos on their screens. In addition, there is also a mode to edit the picture of the screenshot before you save it. It allows you to add shapes, arrows, lines, enter texts, or highlight the areas you want to with colors.
3. Sharing and Export
Recording your screen with Movavi allows you to save your video as an MP3 by extracting only the audio, MOV, AVI, MKV, or MP4, or save it as a GIF file. You can also save the images as JPG, PNG, or BMP.
After saving the recorded video and screenshot, you will be able to upload them to your Google Drive immediately from the app or share them with your family, friends, and colleagues using WhatsApp or other social media platform.
4. Limitations and Price
It is vital to note that you need to choose either a business or personal license according to how you want to use the videos you record. While there may not be any difference in the functions, you can use the app for different reasons or purposes.
So, a business license allows you to use the app for commercial purposes, but on the other hand, it is the opposite for a personal license. A personal license for a lifetime will cost $39.95 and enable you to:
- Grab sound
- Take screenshots and edit them
- Record videos online, and
- Capture videos from the webcam
Official site: https://www.movavi.com/screen-recorder/
System Requirements
- Operating system: Windows 7/8/10; Mac OS X 10.10
- Processor: 1 GHz Intel or AMD CPU, 64-bit processor (recommended)
- RAM: 2 GB
- Hard Disk Space: 2 GB for operating and minimum free space of 280 MB for installing
- Display: 1024 x 768 screen resolution, 32-bit color
- Software size: 42.8 MB for Windows and 89.6 MB for Mac
The Step-by-step Guide to Use Movavi Screen Recorder
Install the program after downloading it from the official site of Movavi. You will have to purchase the software if you want to use all the program features. There is also the option for a free trial that has only a few functions.
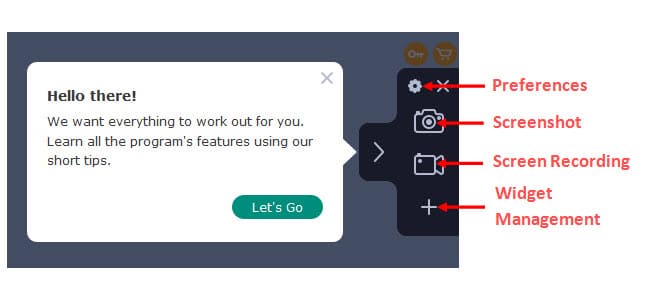
1. Step-1: Launch the software, click on the camera button (for screen recording) after opening the program, and drag the area on the screen you want the program to capture.
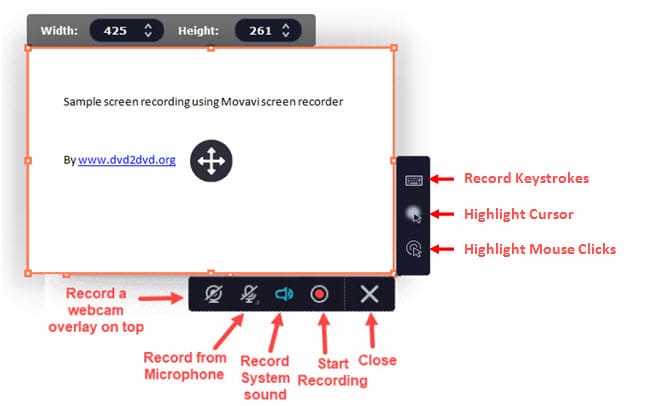
2. Step-2: on the lower part of the panel, you will see several buttons that allow you to add audio, record webcam, etc. If any of the functions are ON, the icons will be green in color. You can begin your recording once you click on the red circle (start recording button) or the press F10 key.
3. Step-3: You can click on the red circle again to stop the recording. After you stop the recording, a new window will appear with the captured screen, and you will need to save it in the format you wish.
4. Step-4: Click on the camera icon to take a screenshot of the screen you want with the program’s help. To add arrows, texts, and shapes, you will need to select the area first. Remember to save the image after you finish up.
Special Offer NOW:
The best alternative software to record streaming videos: Playon.tv
2. OBS Studio (Free)
OBS stands for Open Broadcaster Software, a free & open-source software that allows you to stream live on many sites like YouTube, Facebook and gameplays. The software will enable you to capture or record streaming videos from any operating system, i.e., Windows, Mac, and Linux.
OBS is an open-source Real-Time Messaging Protocol (RTMP) enabled encoder software that makes both experienced and beginners able to create live streams. Please note that any live streamer needs a hardware or software encoder to produce the live feed in the correct format.
The software provides various features even for those who are only setting out to become a broadcaster or are getting adjusted to live streaming. You can customize transitions as you mix different/many sources, use correction tools and video or audio filters, etc.
The Features of OBS Studio
The following are the top features of OBS Studio live stream recorder:
- Clean and Neat Interface
OBS Studio provides an exceptional, easy-to-use interface. With so many available settings, you can easily configure the way you want your live stream. You can even rearrange the icon layout with the help of Modular Dock UI.
- Broadcasting Video
OBS Studio provides its users the option for streaming live videos. The software can support real-time streaming on more than one platform, such as Twitch, YouTube, Facebook, Hitbox, and many more.
- Video Recording
With the use of OBS software, you can record videos without anytime limitations. The software accepts the microphone as the source for audio, and for video sources, it uses a webcam.
- Screen Capturing
You can capture the screen and stream immediately in HD quality. The feature enables you to show your viewers the activities on your screen whenever you want to. It allows viewers to follow the adventures with the gamers they follow.
- Personalization and Branding Options
Unlike most software, you will notice that there will not be any watermark present on the videos. It allows you to add your logo and texts to your live videos easily.
Official site: https://obsproject.com/
The Steps to Use the OBS Studio
To guide you on how to use OBS Studio, here are four simple steps to begin recording or streaming videos with OBS:
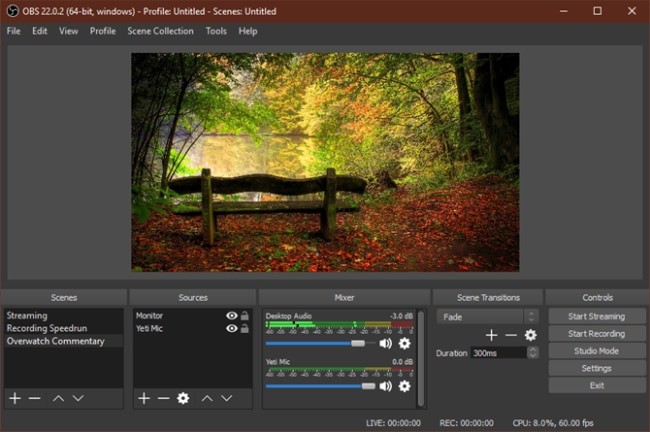
Step-1: Running the Auto-Configuration Wizard
After loading the OBS Studio, the main screen of the program will appear. On the main screen, at the top, you will find a Tools menu. Click on the auto-configuration to automatically configure the settings of the program that will suit your system.
The effect includes your resolution, streaming provider, recording or streaming, bitrate, etc. If you want, configure the settings manually to your preference.
Step-2: Setting Up Your Audio Devices
OBS Studio captures your system’s microphone and audio devices by default. To check the activity status of the audio devices, you can have a look at the main window of the software. You can manually configure the setting from the settings menu as well.
Step-3: Adding The Video Sources
After completing the previous steps, you will have a black screen of the preview. Since OBS Studio does not capture any video automatically, you will have to add the source. You can right-click on the screen or the ‘+’ sign at the bottom of the screen to choose your preferred source.
Step-4: Testing Record and Stream Settings
It is vital to have a second look at the configuration of your settings. You can do this by clicking on the ‘output’ option from the settings menu; after that, click on Start Streaming or Start Recording.
It is better to keep the test running for some time to ensure that there are no problems.
The above are the simple steps that you can use to capture any screen. However, if you are experienced user, you can configure many settings to make a better output.
How to Capture Streaming Videos Online?
The free screen recording programs have been present for quite some time now, and there are many tools available in the market. You can easily capture streaming videos with the help of Apowersoft screen capture software.
3. Apowersoft Free Screen Capture (PC and Mac)
The app is easy and straightforward to use screen recorder, and you do not need to download any extra software for the screencast. The app, being web-based, records any activities on the screen, and all you need to do is open and run the program.
The Features of Apowersoft Free Screen Capture
The app has an intuitive user interface that allows users to experience a smooth use of it during live chat, creating live streams, self-demonstration, and others. Some essential features of Apowersoft free screen recorder are:
- One Button to Record Everything
As mentioned above, the app is web-based. So, the program does not require any additional software for a screencast on your system to record. All you have to do is open the app and run the recorder on your web.
- Simple Recording, Anything You Want
Why click on so many buttons when you can use Apowersoft to create any video with just a click. Whether it’s funny videos, lectures, or tutorials, the program contains a flexible design to capture your screen easily.
You will not find any restrictions on using the tools available in the app and recording anything on your screen – limitlessly. No boundaries; you can record as long as you want, allowing you to record the entire class lectures or TV shows and watch them later.
- Capture Your Screen
Apowersoft Free Screen Recorder gives you the power to capture both audio and video in one go. Any activity on your screen can be recorded, including the sound from your microphone and your system.
- Editing the Screencast
With the app, you can make annotations as you record videos. You will not need to wait for your recording to finish and add notes, shapes, colors, etc.
- Saving And Sharing Your Videos
After completing your task, an option will pop out on the screen to save your work on the local drive or upload it to your Google Drive (or cloud). However you decide to keep your recording, you can share it with your colleagues or friends by providing them with your link with zero problems.
The supported platform:
PC: Windows 10/8/7/XP/Vista
Mac: Mac OS X 10.7 and higher
Official page: https://www.apowersoft.com/free-screen-capture
Guide to Use Apowersoft Free Screen Capture
If you are using the app for the first time, remember to install a launcher even if the app does not need Java Applet. After some time, you can use the program freely without any limitations. Here is a guide on how to use the software:
Step-1: To activate the recorder, click on the ‘Start Recording’ option.
Step-2: To begin recording, first, you will need to customize the region and mode manually.
Step-3: once you finish your recording, ensure to save the file in your local drive or upload it to your Google Drive (or Cloud), YouTube, RecCloud, etc.
Conclusion
Whether you use it for your home or office work, the apps – Movavi Screen Recorder, OBS Studio, and Apowersoft Free Screen Recorder are all very easy-to-use tools. Whether it is recording online audio or video, class lectures, broadcasting, or any of those, these softwares will help make your work much more manageable.
However, the only slight differences among the apps are the limitations that are present among them. While Movavi Screen Recorder may require you to purchase the software to enjoy all the features available in the program; Apowersoft, on the other hand, is entirely free.
Well, it is needless to say that all three apps are definitely worth giving a shot. After all, they offer excellent service for their users by helping your workload a little less. And they help you record streaming videos easily and successfully.

