Last updated on April 18th, 2024
This site is reader-supported. When you buy via links on our site, we may earn an affiliate commission at no extra cost to you.
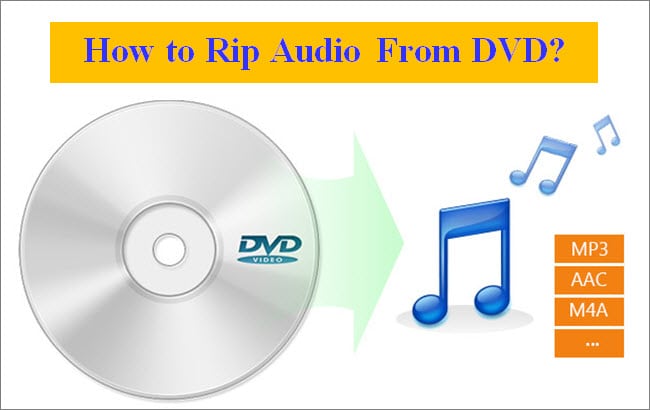
Ripping audio from DVDs allows enthusiasts to preserve iconic movie soundtracks, dialogues, or concert performances in a digital format. Whether it’s a memorable line from a classic film or a live concert’s crescendo, extracting audio ensures that these moments can be relived anytime, anywhere.
This process not only provides flexibility in how we consume content but also breathes new life into our cherished collections. In this guide, we’ll delve into the steps and tools required to seamlessly rip audio from DVDs, ensuring that every beat and dialogue is captured with precision.
#1: How to Rip Audio from DVD with Wonderfox DVD Ripper Pro?
Wonderfox DVD Ripper Pro stands out as the best budget tool tailored for DVD ripping tasks. Beyond its capability to rip video content, it shines exceptionally well in extracting audio from DVDs.
With its intuitive interface, combined with swift ripping speeds, guarantees that users can obtain high-quality audio without any loss from the original source.
The Program Benefits:
- Simplicity at its Best: With just three steps, users can complete the DVD backup process.
- High-Speed Ripping: The software promises blazing fast ripping speeds while ensuring the preservation of the original audio and video output quality.
- Advanced Decryption Technology: It can remove or bypass various DVD copy protections, including CSS, Region Code, CPRM, Multi-angle, RCE, Sony ARccOS, UOP, Disney X-Project DRM, and Cinavia Protection. This ensures a smooth ripping experience even for encrypted DVDs.
- Versatility: The software supports a wide range of DVD types, from movies and TV shows to anime, music concerts, tutorials, and workout DVDs.
- Extensive Type of File: The software literally supports most audio video file formats like AVI, MPG, MP4, MKV, MP3, WMA, WAV, etc. The converted files can shared on video-sharing sites or playable on portable devices/gadgets.
Steps to Rip the Audio From DVD Using Wonderfox DVD Ripper Pro
Follow the guide below to extract audio from DVD movies using Wonderfox DVD Ripper Pro. Make sure you already download and install the software before using it.
Step 1: Load the DVD
Start by inserting your DVD disc into the computer’s DVD drive. Launch Wonderfox DVD Ripper Pro software.

Click on the “DVD Disc” option, this will prompt you to choose a DVD drive, choose the correct drive, and click on the “Ok” button. This will load the DVD content.
Step 2: Choose the Output Format
Look at the right panel and click on the “Output Format:” section to open the output profile.
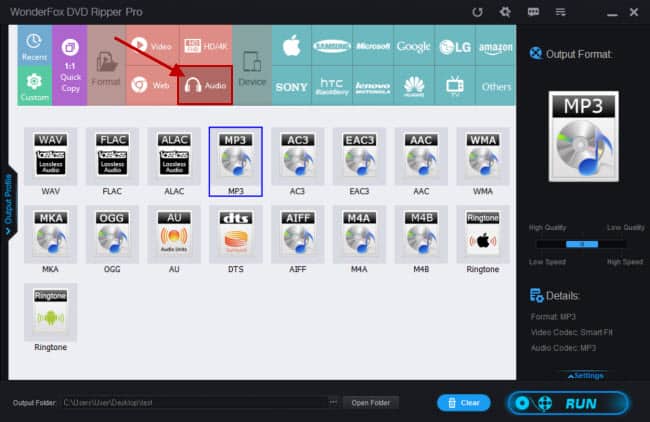
Click on the “Audio” category, and you’ll find a list of audio formats. Select your preferred output format, such as “MP3”.
Step 3: Customize Settings (Optional)
If you wish, you can click on the “Setting” button (above the “RUN” button) to adjust the audio quality, bitrate, and other settings.
If needed, you can choose the different “Output Folder:” (at the bottom of the screen), that’s the destination folder to store the ripped files.
Step 4: Initiate Ripping
Once you’ve configured the settings, click on the “RUN” button. The software will begin extracting the audio, and you can monitor the progress on the screen.
After the extraction is complete, choose a destination folder on your computer to open the ripped audio file.
Tips:
- For the best audio quality, consider choosing a lossless audio format like FLAC.
- If you’re unsure about the DVD’s encryption or region code, Wonderfox DVD Ripper Pro’s advanced decryption technology will handle it seamlessly.
Alternative DVD Ripper to Extract Audio from DVD: WinX DVD Ripper Platinum.
#2: How to Extract Audio from DVD with a Free VLC Media Player?

VLC Media Player is more than just a tool for playing multimedia files; it’s a versatile software that offers a plethora of functionalities. One of its lesser-known but highly useful features is the ability to rip audio from DVDs.
Being a free and open-source application, VLC is accessible to everyone and is compatible across various platforms, making it a go-to choice for many.
The Program Main Benefits:
- Cross-Platform Compatibility: VLC is available for Windows, Mac, Linux, and even mobile platforms, ensuring that users across different devices can utilize its features.
- Support for Multiple Formats: VLC can extract audio in various formats, including MP3, FLAC, WAV, and more.
- Customizable Settings: Users have the flexibility to adjust audio settings, such as bitrate and sample rate, to suit their preferences.
- No Additional Downloads: There’s no need to download extra plugins or add-ons to rip audio from DVDs.
- Beyond Audio Extractor: Although VLC is primarily a media player, you also can use it as a DVD ripper, video converter, video downloader, and Internet radio.
Steps to Rip Audio From DVD Using VLC Media Player
Just like any other desktop software, you need to download and install the software before you can use it. Once completed, follow the guide below to extract the audio from the DVDs.
Step 1: Launch VLC Media Player
Start by opening VLC Media Player on your computer.
Step 2: Access the Media Menu
Click on the “Media” menu and from the drop-down list, select the “Convert / Save” option. This will open the “Open Media” window.
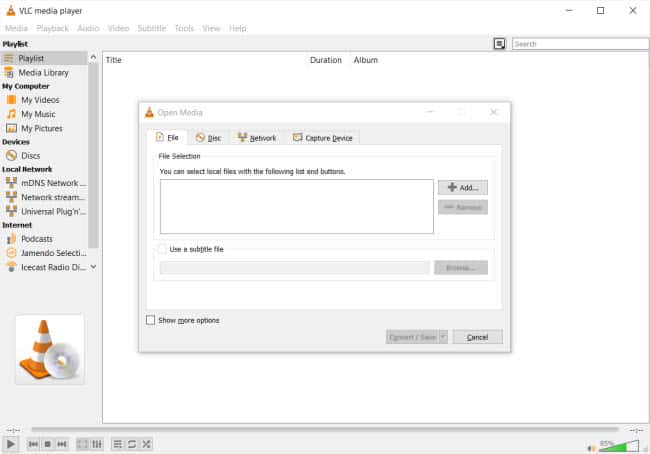
Step 3: Load the DVD
From the “Open Media” window, click on the “Disc” tab. Under the “Disc Selection” area, ensure that the “DVD” option is selected, and then choose the DVD drive from the dropdown list.
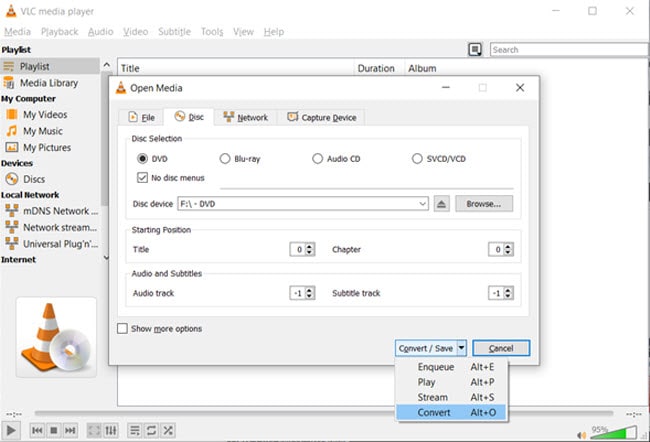
In the “Convert / Save” button, click on the down arrow beside it and choose the “Convert” option. This will open the “Convert” window.
Step 4: Select Audio Format
From the “Convert” window, click on the “Profile” dropdown menu and choose your desired audio format. For instance, if you want an MP3 file, select “Audio – MP3”.
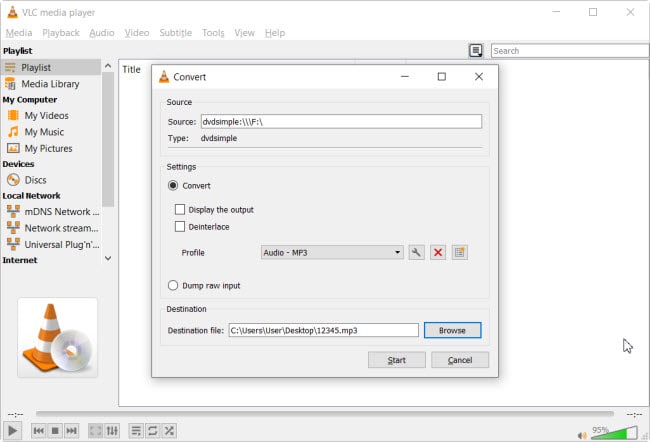
In the “Destination File:” column, click on the “Browse” button to choose your desired folder and file name where the ripped audio will be saved. Click the “Save” button once the file name is given.
Step 5: Start the Extraction
Once everything is set, click on the “Start” button. VLC will begin extracting the audio from the DVD. The timeline at the bottom will show the progress.
Tips:
- Ensure that the DVD is free from scratches or damage for a smooth ripping process. Else, learn how to fix it here.
- If you’re aiming for high-quality audio, consider using a lossless format like FLAC.
- Remember to respect copyright laws and only rip DVDs you own for personal use.
#3: How to Rip Audio from DVD with a DVD Audio Extractor?
DVD Audio Extractor is a specialized software designed exclusively for the purpose of extracting audio from DVDs and Blu-ray discs. With its powerful capabilities, it can pull audio streams from your favorite movies or concerts and save them in various formats, ensuring high-quality output.
Whether you’re an audiophile wanting to preserve a concert in FLAC or someone looking to extract dialogues in MP3, DVD Audio Extractor has got you covered.
The Advantages of this Software:
- Multiple Output Formats: The software supports a range of audio formats, including OGG, MP3, Wave, and FLAC.
- Direct Demuxing: DVD Audio Extractor can demux audio streams directly to formats like mlp, pcm, mpa, ac3, or dts.
- CD Image Creation: A unique feature that allows users to convert DVDs directly to Audio CDs or DTS-CDs in a single step.
- Cross-Platform Support: It’s available for Windows, Mac OS X, and Linux, ensuring accessibility for users across different operating systems.
- User-Friendly Interface: The software boasts an easy-to-use interface, combined with features like multi-channel capability, arbitrary sample rate resampling, and audio previews.
Steps to Extract Audio From DVD Using DVD Audio Extractor
Step 1: Setup, Launch, and Select Audio Streams
Download & install DVD Audio Extractor on your computer. Place the DVD you wish to extract audio from into your computer’s DVD drive. Launch the application and the contents of the disc will display.
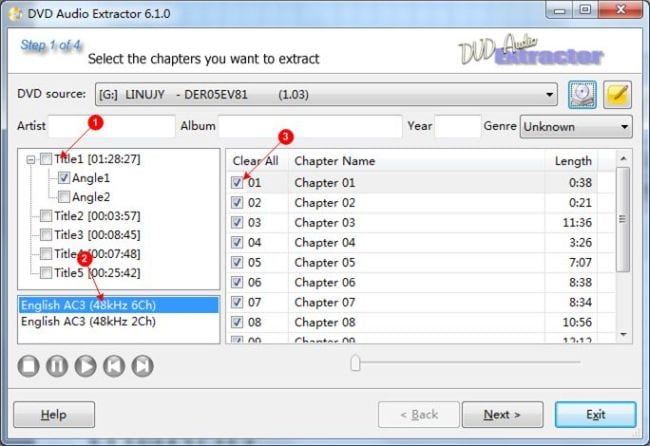
By default, the Title 1 will be activated [label 1 above]. You also can change the active title by clicking on it.
The software will display the available audio streams on the DVD. Choose the ones you wish to extract [label 2 above]. Also, all the chapters in the first title are selected. To change the selection, click on the check box before each chapter [label 3 above].
Click on the “Next” button to proceed.
Step 2: Choose the Output Format for Encoding
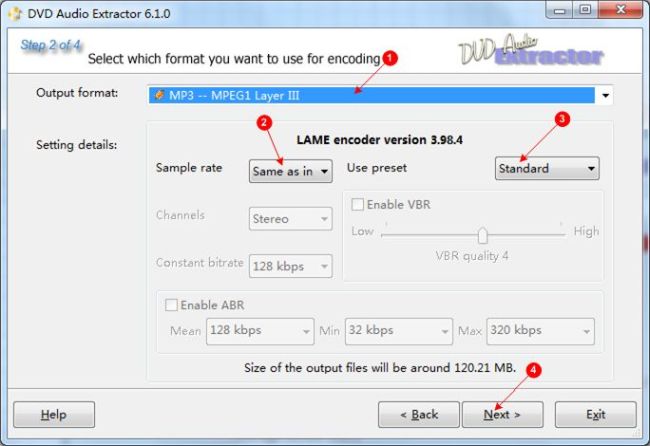
In the “Output format:” drop-down menu, select your desired audio format, such as MP3, FLAC, or WAV. Here, you can select the MP3 as an output format [label 1 above].
You can change the sample rate [label 2 above], for example, you can set it to 44100 Hz. The preset can just leave it as “Standard” as it’s good enough for general use.
Click on the “Next” button to continue.
Step 3: Set Output Location and Other Settings
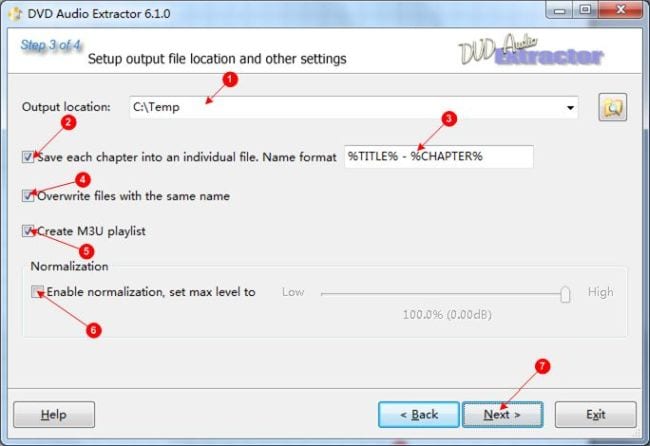
There are several settings to change:
- Output location – Specify a destination folder on your computer where the extracted audio will be saved.
- Save each chapter into an individual file – You can check the option to avoid everything saved into a single file.
- Overwrite files with the same name – You can check the option so that the program will overwrite the same file name if already exists in the output location. Make sure you also backup the files extractor before.
- Create an M3U playlist – Check the option for easy playback.
- Enable normalization – Enable this option to raise the peak level of an audio file by setting the max level.
Click on the “Next” button to proceed to the next page.
Step 4: Begin Extraction
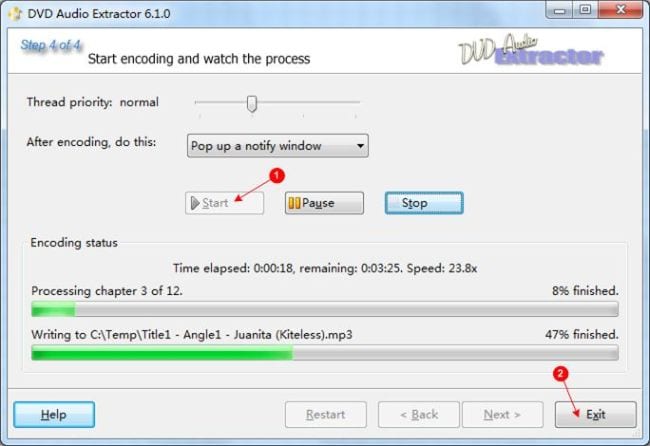
Click on the “Start” button to begin the process. The software will process the DVD and extract the selected audio streams. When finished, click on the “Exit” button to quit the program.
Tips:
- For pristine audio quality, opt for lossless formats like FLAC.
- If you’re extracting audio from a concert DVD, consider creating an Audio CD directly using the software’s unique feature.
- Always ensure your DVD is in good condition to avoid any reading errors during the extraction process.
Conclusion
Ripping audio from DVDs provides a convenient way to preserve and enjoy cherished soundtracks, dialogues, or live performances across various devices. With a plethora of tools available, both free and paid, users can easily navigate the process, ensuring high-quality audio extraction.
Whether you’re an audiophile or a casual listener, understanding the nuances of ripping can enhance your multimedia experience. Always remember to respect copyright laws, ensuring that the content is used responsibly and ethically. As technology continues to evolve, such methods further emphasize the importance of adaptability in our digital age.
Frequently Asked Questions (FAQs)
Q1: Can I rip audio from any DVD?
While most DVDs can be ripped, some may have copy protection that might require specialized software like WinX DVD Ripper Platinum to bypass.
Q2: Is the audio quality compromised during the ripping process?
With the right software and settings, the audio quality can be preserved. However, the output format and bitrate can influence the final quality.
Q3: Are there any legal implications to ripping audio from DVDs?
Ripping audio for personal use is generally considered legal in many countries. However, distributing or selling ripped content is illegal.
Q4: Can I rip audio from Blu-ray discs as well?
Yes, some tools like DVD Audio Extractor and HandBrake also support Blu-ray discs. Else, you can check out the Blu-ray rippers.
Q5: How long does it take to rip audio from a DVD?
The duration depends on the software, DVD length, and computer performance. On average, it can take anywhere from a few minutes to an hour.