Last updated on April 11th, 2024
This site is reader-supported. When you buy via links on our site, we may earn an affiliate commission at no extra cost to you.
VideoProc Converter is a 4-in-1 multimedia tool that you can use to download & convert videos, convert DVDs, and capture the computer or webcam screen. So, if you have a collection of DVDs or videos that you wish to convert for playable on mobile devices, this software can help you.
But do you really know how to use VideoProc converter software? Well, this article will guide you to download, install & activate the software, as well as a step-by-step guide to using the software with graphical illustrations.
I.) Download and Install the VideoProc Converter
Before you can use the software to convert any video or audio files, you need to download and install the software successfully only you can use it. Follow the steps below.
To Download the Software
1. First, go to this site to download the installer file: https://www.videoproc.com/video-converting-software/
2. To download and free trial of the software, click on the “Free Download” button. This will download the installer [videoproc.exe]. Else, you can click on the buttons below:
To Install the Software
3. To begin the installation, locate and double-click on the downloaded installer .exe file. When prompted in the “User Account Control” window, click on the “Yes” button to start.
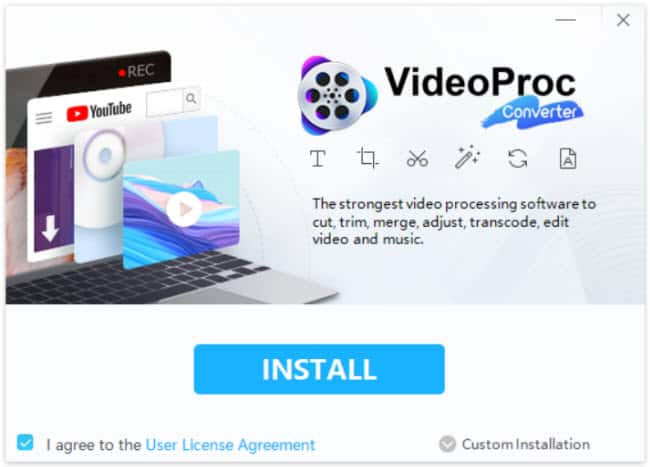
4. Click on the “INSTALL” button and the program will install on your computer. The installation is super easy and after a few seconds, it will be complete.
5. You will notice that the installation is super easy. Click on the “Launch” button to launch the software.
II.) Purchase and Activate the VideoProc Converter
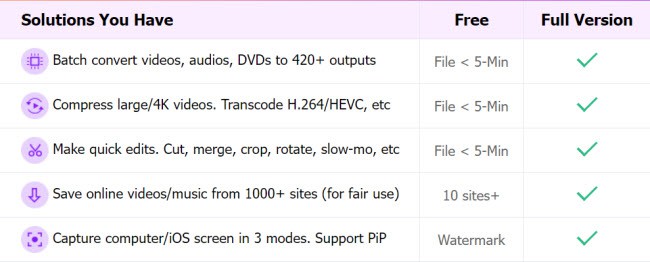
Why do you need to buy the full license of this software? Well, there are several limitations if you are using the trial version as you can see in the following picture.
To Purchase the VideoProc Converter
1. Visit the official site: https://www.videoproc.com/video-converting-software/buy.htm
2. As you can see, there are 3 plans available. Choose a plan that is most suitable for you. Here, we will choose the “Lifetime License”, so click the “Buy Now” button under it.
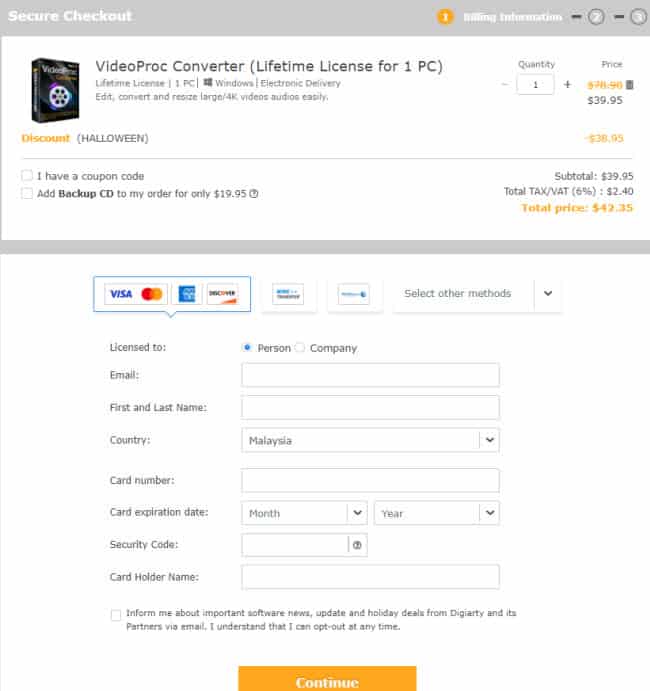
3. From the screen, there are several options you can change.
- The “Quantity” – click the + or – to modify the quantity to purchase.
- If you have a discount coupon, check the “I have a coupon code” option, insert the coupon code and click the refresh icon.
- Select the method of payment – credit card, wire transfer, or check. Then, fill in all the information correctly.
4. Once ready, click on the “Continue” button to proceed to make the payment. Once successfully paid, you will receive the activation code through the email address provided.
To Activate the VideoProc Software
If you have not purchased the software, you need to purchase it and get the activation code before activating the software. Purchase the software here.
1. Launch the VideoProc Converter software and you should prompt a window asking you to register the software. If not, click on the “Register” option at the bottom right of the screen.
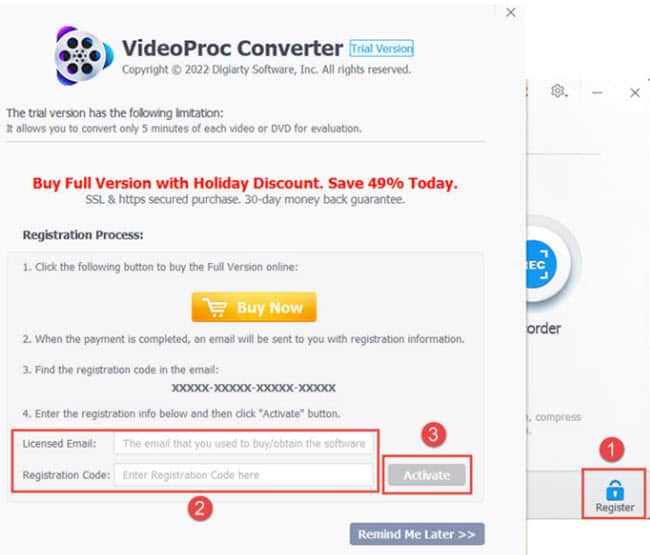
2. In the “License Email:” column, insert an email address while you purchase the software. In the “Registration Code:” column, insert the registration code that you received in your email.
3. Click on the “Activate” button. This will activate the software and you can use all of the software features without limitations.
III.) How to Use VideoProc Converter?
As you may see, the VideoProc Converter has 4 major functions; and in this section, I will guide you on how to use each of the functions below.
1. To Convert a Video
One of the main functions of this VideoProc Converter is to convert video from one format to another format that can be played on PC/Mac as well as smartphones/gadgets. Let’s convert MP4 to MKV file as an example here:
1. From the main menu, click on the “Video” option, and this will open a new window:

2. Click on the “+Video” icon and a new window will pop up asking you to choose the video file to convert. Choose a file from your computer and click on the “Open” button.
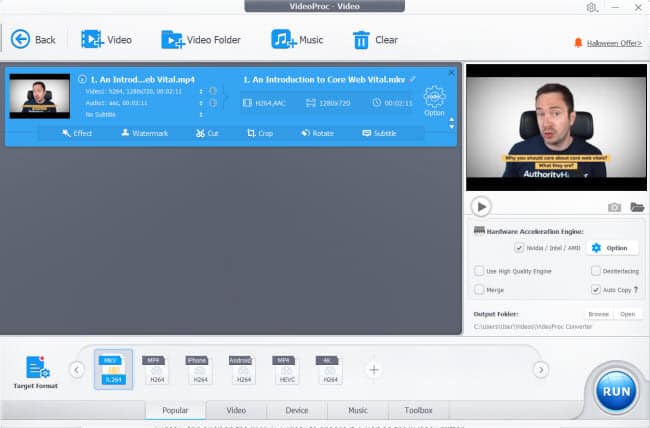
In the right-hand panel of the screen, you have several options:
- Preview – Click on the play button to preview the video before converting.
- Use High Quality Engine – Check this option to ensure better quality on output files.
- Merge – Check this option only if you want to merge 2 or more videos together.
- Deinterlacing – Check the option to produce a better quality video output.
- Output Folder – Change the location to store the converted files by clicking on the “Browse” button and choosing a new folder.
3. Next, choose the intended output format by clicking on the “Target Format” icon to open an output profile window. On the left-hand panel, scroll down until you see the “General Video”, and click on the “MKV Video” to choose it. Click on the “Done” button.
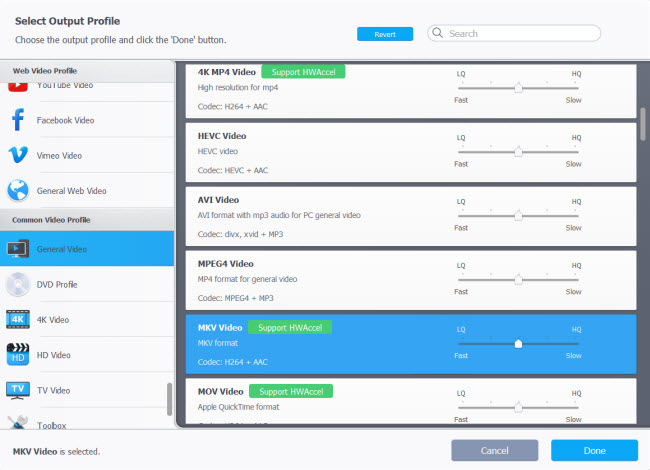
Note: If you want to convert the video to audio only, you can select “Music” in the left panel, and choose the audio format like MP3.
4. Finally, click on the “RUN” button to start converting the video. It will take some time for the program to convert the video to the MKV format depending on the original video size.
2. To Convert a DVD
To use the DVD function, make sure you already insert a DVD disc into your computer DVD drive. Then, I will show you how to convert a DVD to digital format effortlessly.
To Digitize a DVD
1. From the main menu, click on the “DVD” option, and you will see the following screen:
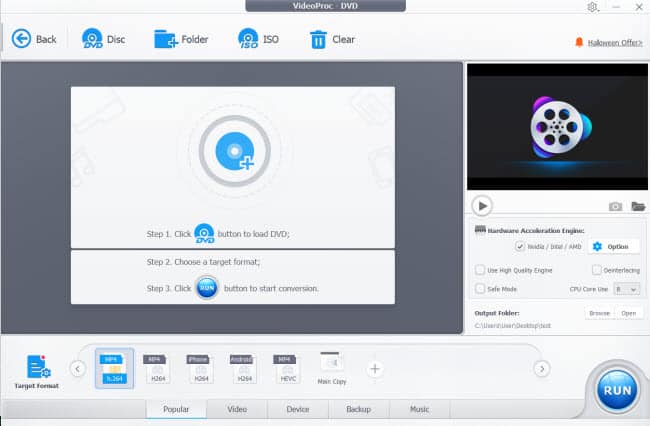
2. Click on the “DVD Disc” icon and a new window will pop up asking you to select the source DVD disc. You should select the computer DVD drive and click on the “Done” button. This will load the source disc and display the info on the program interface.
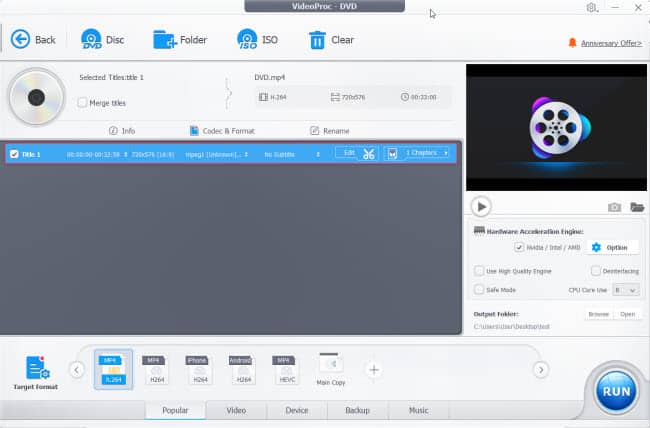
In the right-hand panel, you have several options:
- Preview – Click on the play button to preview the video before converting.
- Use High Quality Engine – check this option to ensure better quality on output files.
- Safe Mode – Check this option if you encounter unexpected DVD converting errors like system halt, converted videos unplayable, etc.
- Deinterlacing – Check this option for better video output quality, especially true for interlacing videos.
- Output Folder – You can click on the “Browse” button and choose a new folder to store the converted files.
3. Next, choose the output file format. On the bottom left of the screen, click on the “Target Format” option and this will open a new window to let you choose the suitable file format.
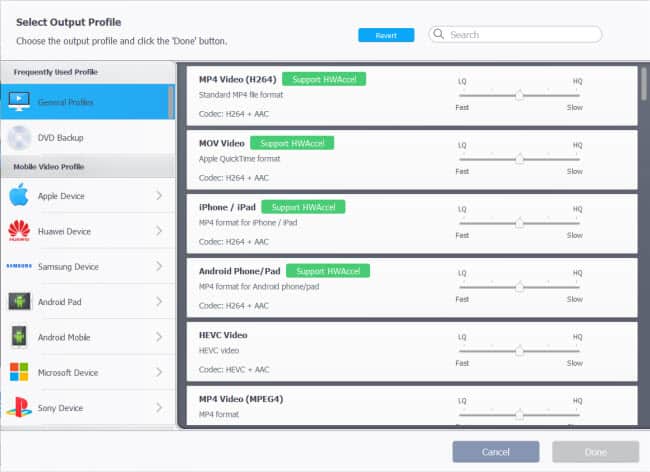
For example, you can click on “General Profiles”, and choose “MP4 Video (H264)” before clicking the “Done” button. This will convert the DVD to MP4 format. Of course, you can choose the available mobile phone-compatible formats too.
4. Then, you can click on the “Codec & Format” to do changes to various settings. If you don’t know, just leave the default settings.
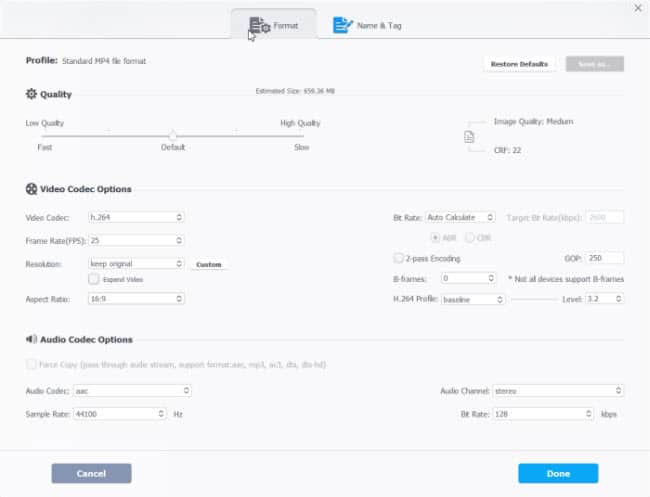
From the window, there are several video settings that are worth to know it:
- Quality: Use your mouse to drag the bar to the left or right as needed, this will affect the output quality converting speed, and file size.
- Video Codec: No changes are needed, just leave it as h.264.
- Frame Rate (FPS): You can keep the setting as 25. If the video is in high motion like sports, you can increase the FPS to 30 or even higher.
- Resolution: The higher resolution will produce higher video quality and file size too. However, a normal DVD is either 720×540 or 720×480, so it’s not ideal to set the resolution higher than this unless you use video enhancer software. Recommended: keep original.
- Aspect Ratio: 4×3 is a standard ratio; or a 16×9 (widescreen). Recommended: keep original.
- Bit Rate: This will affect the video quality and file size. You can leave the setting as “Auto Calculate”. If you set it to “Manual”, the “Target Bit Rate (kbps)” can be set to 2000.
- 2-pass Encoding: Check this option to retain the best image quality but the conversion speed will decrease.
- GOP: Group of Pictures is made of I, P, and B frames starting with I frame. If you want to have better output quality, the value of GOP can be set smaller. Otherwise, no changes are needed.
- B-frames: They contain differences relative to both preceding and following frames. Since not all devices support it, just leave it intact.
- 264 Profile: The popular video coding standards that if you set the level higher, the better output quality. You can keep the level at 3.2.
For audio settings, you can accept the default settings. When finished, click on the “Done” button and this will back to the “VideoProc – DVD” window.
5. If you think all the settings are perfect, just click on the “RUN” button to start converting the DVD.
To Back up a DVD at 1:1 Ratio
Follow the steps in digitize a DVD above, until step 3 (Select Output Profile window), you choose the “DVD Backup” option and there are 6 options that you can choose.
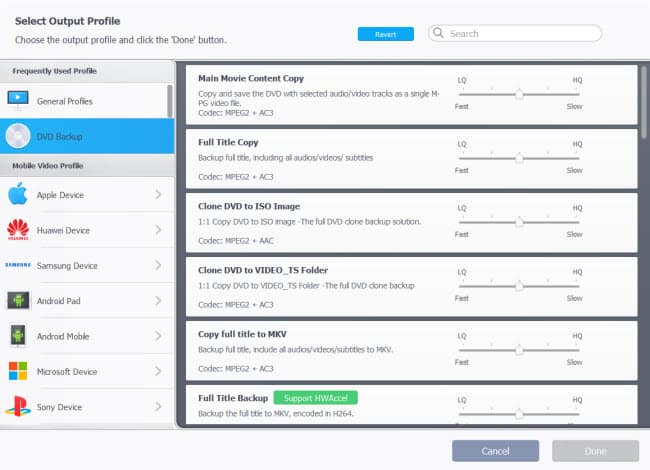
- Main Movie Content Copy – only backup main movie content to MPG format.
- Full Title Copy – copy all the available titles including audios/videos/subtitles.
- Clone DVD to ISO Image – this option will copy DVD to ISO Image.
- Clone DVD to VIDEO_TS Folder – this option will copy DVD to VIDEO_TS folder.
- Copy Full Title to MKV – copy all the available titles to MKV format.
- Full Title Backup – copy DVD to MKV file encoded by H.264.
To copy the DVD at a 1:1 ratio, choose the “Full Title Copy” option and this will duplicate the DVD. Then, click on the “Done” button.
3. To Download a Video
You also can use the VideoProc converter to download videos from major video-sharing sites. After downloading, you can use their convert function to convert the video to the intended output formats for playback on various devices.
1. On the main menu, click on the “Downloader” icon. This will open the “VideoProc – Downloader” window.
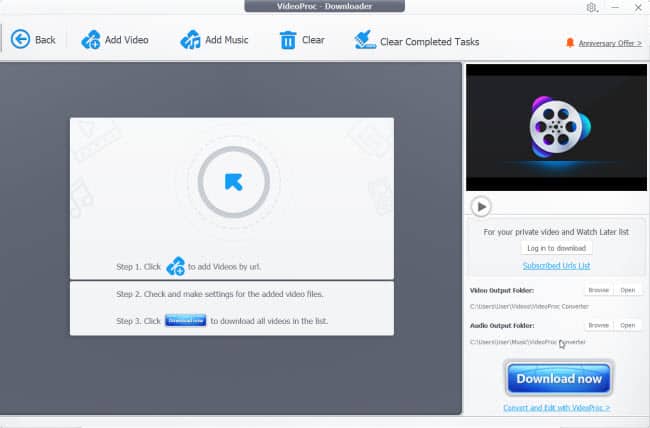
You need to go to Youtube or other video sites and search for the video you wish to download. Then, copy the entire video address (URL). In this example, we will download a video from vimeo so you go to vimeo.com and search and copy the URL to download.
2. Back to VideoProc software, click on the “Add Video” icon and this will pop up a new window. Paste the vimeo link click on the column provided and click the “Analyze” button. The software will analyze the video and display the info on the screen.
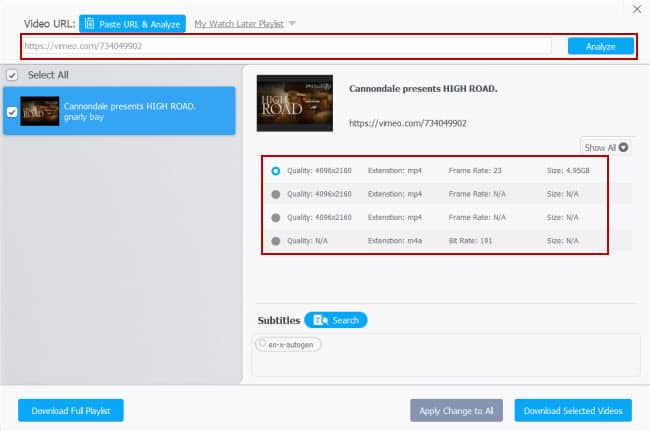
3. You can choose the video quality, and then click on the “Download Selected Videos” button. This will return to the previous window as follow.
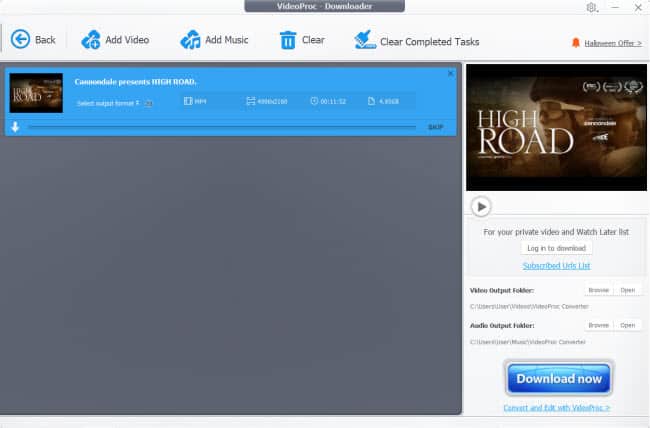
4. You can change the “Video Output Folder” and “Audio Output Folder” location by clicking on the “Browse” button and choose a new folder. This will be the folder to store the downloaded videos. Once ready, click on the “Download now” button to start downloading the video.
4. To Record a Video/Screen
If you encounter some online streaming sites like Netflix, you may unable to download the videos unless you use the stream video downloader or video recorder to record them.
With this program, you can record portions or entire computer screens. Besides, the VideoProc converter also can record video with a webcam. Alternatively, you have to purchase video capture software.
To Record Desktop Screen
1. Click on the “Recorder” icon on the main screen. This will open the “VideoProc – Recorder” screen.
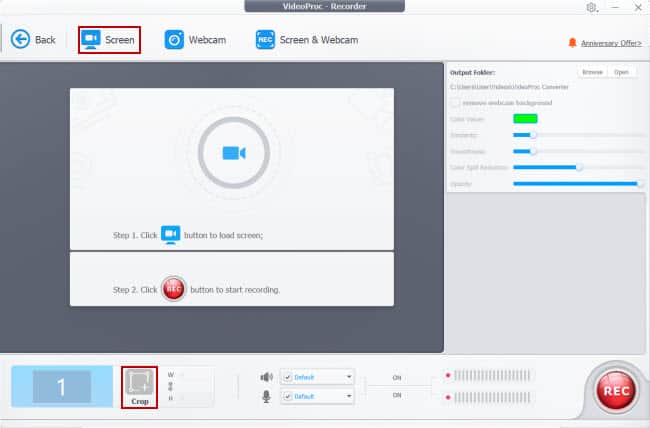
2. Click on the “Screen” option at the top of the screen. By default, the software will record the entire screen.
3. [If needed] You can click on the “Crop” icon to target specific area recordings. Here you can switch to the window to capture and use your mouse to click and drag the area of the screen you wish to record (blue line). Press the “Esc” key to exit the cropping.
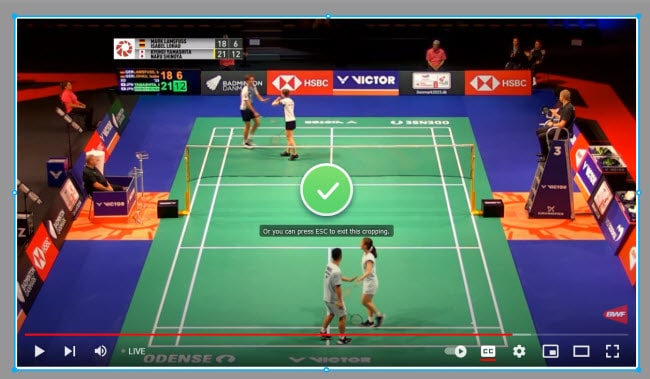
4. Switch back to the VideoProc Converter screen and click on the “REC” button to start the recording. When finish recording, you should come back here and click on the “STOP” button.
To Record Video with Webcam
1. Click on the “Recorder” icon on the main screen to open the “VideoProc – Recorder” screen.
2. Click on the “Webcam” option, the program will automatically detect the webcam on your computer or laptop. If you are using an external webcam on a PC, make sure to connect it properly.
3. By default, it will capture the entire screen on the VideoProc Converter program. Just click on the “REC” button to start the recording.
4. When you wish to stop recording, click on the “STOP” button.
To Record Screen & Webcam
1. Launch the software and click on the “Recorder” icon on the main screen to open the “VideoProc – Recorder” window.
2. Click on the “Screen & Webcam” option, and you will prompt with 2 options:
- Record screen while showing facecam – most suitable for educators that will capture the screen while also showing your face at the corner of the screen.
- Record webcam while showing screen – it will record the webcam and the screen will show on the corner.
3. For example, you choose the “Record screen while showing facecam” option. Then, click the “REC” button to start the recording.
4. When the recording finish, click on the “STOP” button.
Conclusion
In terms of program features, you can see that VideoProc converter is an amazing multimedia software. You just need to get one software for most of your multimedia-related tasks including converting videos and DVDs.
If you buy similar software from other companies like WonderFox or Digiarty software (WinX series of products), you need to buy 2 software, i.e. dvd ripper and video converter separately.

