Last updated on April 11th, 2024
This site is reader-supported. When you buy via links on our site, we may earn an affiliate commission at no extra cost to you.
These days, recording videos are easy procedure using portable media players and smartphones, but this wasn’t always the same. In previous days, video cameras/recorders were used to capture videos which then were kept on VHS tapes.
Thus, in case you’ve got a pack of these VHS tapes and now wish to watch them with your loved ones and family, the best method is to convert VHS to DVD formats. Once your tapes get converted, you can live the special memories all over again on an oversized TV screen or computer.
We are going to discuss the 3 foolproof methods to convert your VHS to DVDs. Several VHS to DVD converters is available there to convert your VHS tapes. So, continue reading this article to convert your VHS to DVDs and allow your special memories to live forever & ever.
How to Convert VHS to DVD at Home?
In case you wish to save some extra money and are also willing to work as less as possible, then there is nothing better than using a DVD recorder. A DVD recorder is an uncomplicated DIY option available in the market now.
It lets you pop in a VHS (for this, you’ll have to use a VCR). You just have to insert the DVD-R disc (It’ll open in a “New Window”), and then press play record to convert the video.
You need to wait for some time, but you won’t have to work much, and it is available at a more affordable price than employing a skilled service especially when you’ve got plenty of tapes to convert. So, let’s now see what are the methods to help you convert the VHS to DVD at home.
Method I: Using a VHS to DVD Recorder
One of the best ways to convert VHS to DVD format is by utilizing a DVD recorder and VHS VCR combo. It is essentially a single combo unit that consists of a VCR and a DVD recorder. There are several types and brands of the combination available.
We picked the top 3 best VCR DVD burner combo units by considering a variety of key features. Here is a list below.
1. Best Budget: Samsung DVD-VR375/DVD-VR375A Tunerless DVD Recorder VHS Combo
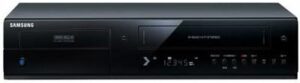

The Samsung DVD-VR375 is an affordable DVD and VCR combo recorder that is capable of converting DVD to a 720p or 1080p high-definition. Thanks to Samsung’s reliability and useful features of the device.
It is among the most satisfactory multi-format appliances. It can record all 5 types of DVD formats: DVD-R, DVD+R, DVD-RAM, DVD-RW, & DVD+RW. That means a lot of flexibility and you will not have to be concerned about buying incompatible blank DVDs.
Besides that, there is an HDMI output given together with upscaling feature. Thus, you can select to play as well as record at 1080p/1080i/720p. Just remember you will need an extra tuner in case you wish to record directly from your Smart TV.
Just like most Samsung appliances, this combination unit is quite easy-to-use as well as will last a long period than other similar products available in the market. And this is something you would expect for such a cost. Visit Samsung support here.
- 1080p upscaling support.
- DV(IEEE) input; HDMI output included.
- 4-head stereo VCR recorder.
- The device is not intuitive but you can read the manual.
For more details about this Samsung recorder, watch the following video:
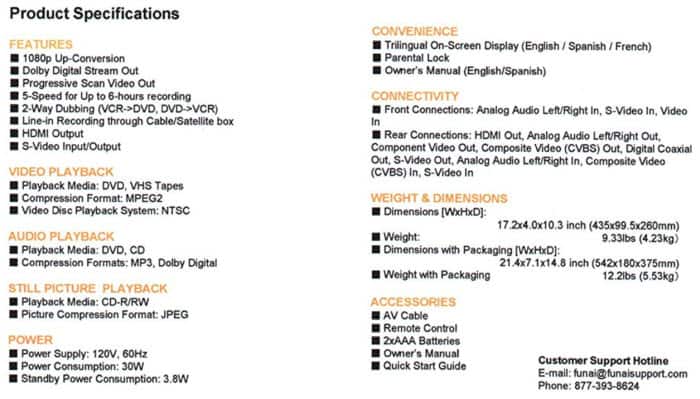
2. Best Overall: Funai ZV427FX4 DVD Recorder/VCR Combo (No Tuner)
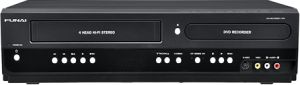
The Funai VCR and DVD Recorder is the top pick since the combo unit offers a lot of features and helps get DVD formats without compromising on the video quality. You can convert VHS tapes into DVDs and also dub DVDs into VHS tapes.
You can even record from satellite playback or live cable. The Funai combination player supports, HDMI output, RCA, and also s-card input & output, as well as features a 4-head Hi-Fi stereo.
Among the most useful features is that the device can record for up to 6 hours straight, and its 1080p up-conversion confirms that even the oldest VHS footage gets clearer than the time it was recorded.
The 6-hour recording mode allows you to record long program series and sporting events in the same grade as a 2-hour recording mode. Using this combination, your VHS player will become moot.
Use DVD-Rs for the most satisfactory results with this combination unit. You will surely love the both-way dubbing that lets you record from VHS tapes to DVD formats or DVD formats to VHS tapes.
- Line in recording for satellite and cable live content.
- HDMI output that supports SD to HD.
- 1080p high-quality digital copy result.
- Disc configuration can be unreliable.
- VHS playback can come with noise.
3. Good Deal: Magnavox ZV427MG9 DVD Recorder / VCR with Line-In Recording (No Tuner)
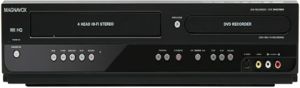
Most people do not want to spend all their day working with electronics and get that to work. Well, the good news is that the Magnavox ZV450MW8 DVD recorder & VCR combination is a unit that can help you get the work done easily. Moreover, this unit also can be connected to your smart TV. Isn’t it great!
You will like that this unit’s DVD player backs the most common formats of DVD+R/RW and DVD-R/RW. It comes with a single-touch recording system and even supports both-way dubbing between DVD and VHS file formats. Coexisting playback and recording functionality of this device makes it a seamless unit that works the best to store your age-old memories.
Additionally, you will have the capacity to record all of the most pleasing TV programs from your smart TV. These characteristics will make it a useful addition to anyone’s household entertainment.
Magnavox’s service for a VCR DVD combination is perfect for the individual who just wants an electronic unit that is easy to install as well as use. The in-built SD tuner makes this easy to pre-program the recordings for live TV, and single-touch 2-way dubbing from DVD to VHS and VHS to DVD formats makes it a user-friendly unit.
- 5-speed and up to 6 hours of recording.
- Two-way dubbing between DVD to VHS and VHS to DVD formats.
- Built-in SD tuner to record live TV series or even from the satellite.
- Live recording can be unreliable.
Method II: Using a VHS to DVD Converter
The VHS tape to DVD format converter can assist save your special VHS recollections before it is too late. VHS tapes someday decay, no matter how carefully you stored them. However, the good news here is that the VHS tapes to DVD converters can keep your memorable footage in DVD or digital form.
And they are quite effortless to use, as well. You just need to connect the VHS tapes to your camcorder or video recorder, and they will transfer your videos to your PC as digital formats.
Then you can burn these formats to DVD, and transfer them through email, Facebook, YouTube, etc. So, here are the two most effective products to convert your VHS to DVD. Let’s have a look at the list of the items.
1. Elgato Video Capture Device
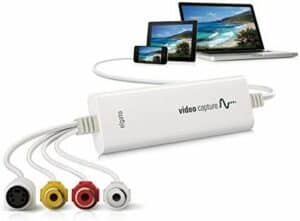
Elgato Video Capture Device is one of the best VHS to DVD format converters available in the market right now. This is because the device’s transfer quality is wonderful.
However, the old video you’ve got is still going to look quite ropey to you if you are used to the modern age of crystal-clear HD video footage. But this unit will at least crack it to digital format as clearly as possible, as well as avoid losing any more definition in either the video or audio.
The device is easy to use as you can use the accompanying Elgato Video Capture software to assist you in setup the device, from connecting to capturing video and sharing the files. You can choose to play the files on your computer (Windows Media Player or iTunes) or sync them to your iPad/iPhone or upload them to Youtube.
The device supports S-Video, RCA, and SCART information, so you must be capable of connecting any VHS camcorder or recorder to your PC. Additionally, it is consistent with all newer versions of macOS and Windows. So it is an affordable device, hence the device is highly recommended.
Features Highlight
- Support: Transfer video from VCR, DVR, Camcorder, VHS, and other analog video devices
- Interface: USB 2.0
- Input format: NTSC, SECAM, PAL, and PAL/60 video
- Compatible with: Windows 7 or newer, macOS 10.6.8 or newer
- Includes: Elgato Video Capture device, composite to SCART adapter, composite video/RCA stereo cable, and software (also can be downloaded online)
- The high-quality transfer process for video footage.
- Allow trimming before finalizing for output.
- Supports Windows & Mac OS X.
- The video file cannot go for high-definition. Supported max. resolution is 640 X 480p.
Official page: https://www.elgato.com/en/video-capture
How to Use Elgato Video Capture Device?
The Elgato video capture device records video in H.264 format with AAC audio. The recorded video can be edited with Windows Movie Maker, or iMovie ’09, or later on Mac. Also, the recorded format can be played on most Apple devices like iPhone, iPad, iPod & Apple TV or uploaded to Youtube.
Before we use the device, the basic requirement to use the device is to use a Windows 7 or newer OS. It’s recommended you install Quicktime 7.6.6 or newer and iTunes 10.4 or later.
Make sure you connected all the cables from the Elgato video capture device to your DCR as well as to your computer correctly. Here is a step-by-step guide to using the Elgato Video Capture device.
Step 1: Install & open the video capture software of Elgato
- From your PC, open the browser and download Elgato Video Capture software by going to the URL: https://www.elgato.com/en/video-capture/support
- You also need to download and install the driver for Elgato Video Capture as this is the only way for the device to communicate with your computer.
- Install the software. In case a message pop-up says required to install .NET Framework 3.5. Please download and install the application first and then run the Elgato installer again.
- You should see the following screen.
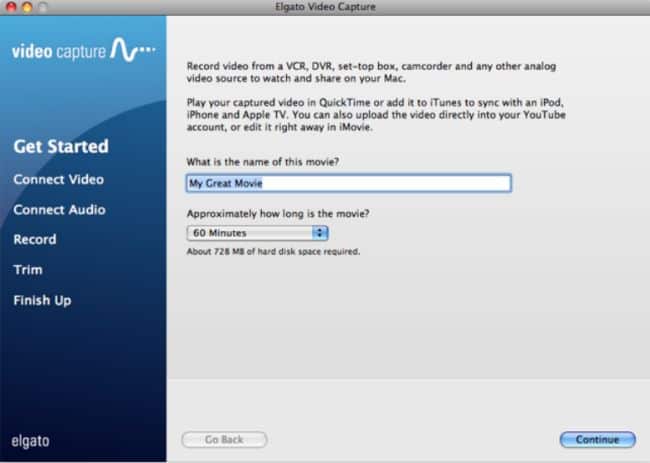
- You can give a name for the movie file and can leave the movie length to 180 minutes. Click on the Continue
Step 2: Connect the Video & Audio and Start Recording
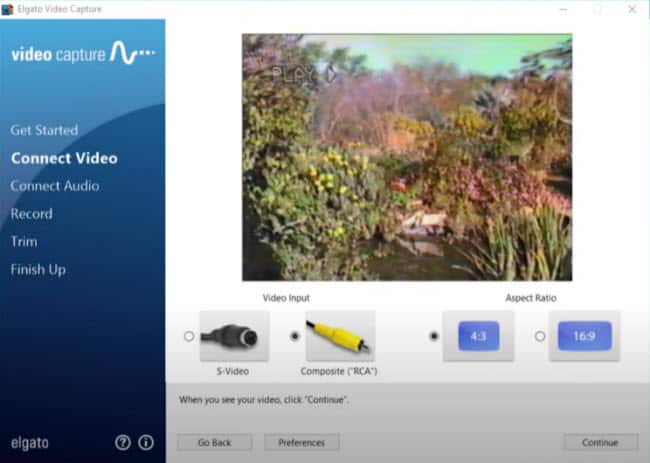
- For Video Input, see the device that you are using. Choose “Composite (RCA)” if you are using a DCR. Choose “S-video” if you are using a camcorder.
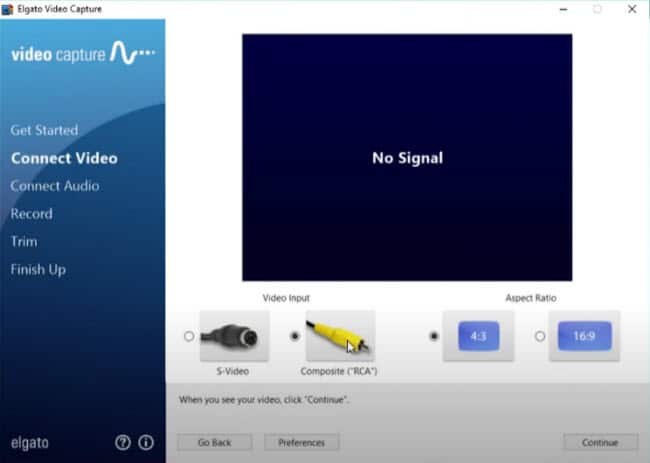
- On the other hand, for the Aspect Ratio, which is the frame for your video, the “4:3” option should be good to go.
- Then, turn ON your VCR, inserts the VHS tape, and play the video, and after the video starts playing on your screen. If you see the video is great, click on the “Continue” button.
- Ensure you can vividly hear the audio of your tape (see some moving green bars on your screen). When you can hear the sound, click on the “Continue” button. In case you can’t hear any sound, try the given steps:
- Ensure headphones are not plugged into your PC
- Ensure the volume of your PC is turned up around halfway
- Also, ensure the RCA wires are correctly connected to your video player (VCR) as well as to your Elgato Video Capture device.
- You have 2 options here (you may not need to use these options):
- Check the box “Mute sound” option if in case your tape does not have any sound.
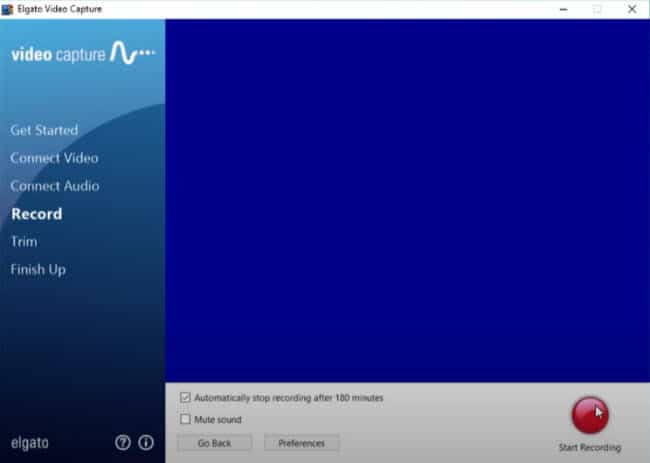
- Check the box “Automatically stop recording after * minutes” in case you know the exact length of the video.
- Rewind the tape again. Then click the “Start Recording” button as well as press play on your video player. So, now the content is being recorded. It will record in real-time, so you’ll have to watch the video while it is converting.
- As soon as the video is done playing, click the “Stop Recording” button.
Step 3: Trim the Video
- You have an option of trimming the beginning & end of the recording only if you want to. Just move the marker as shown in the picture below:
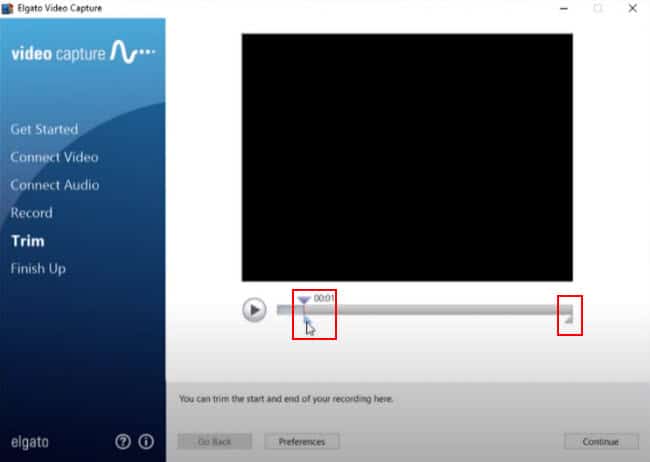
- Drag the blue triangle around on the gray bar’s top to look at different parts of the video tape. And to trim the beginning and/or end, move the gray triangles given on either end.
- Then click on the “Continue” button. The software will do the trimming process and it takes some time depending on the length of the video.
Step 4: Finalizing for Output
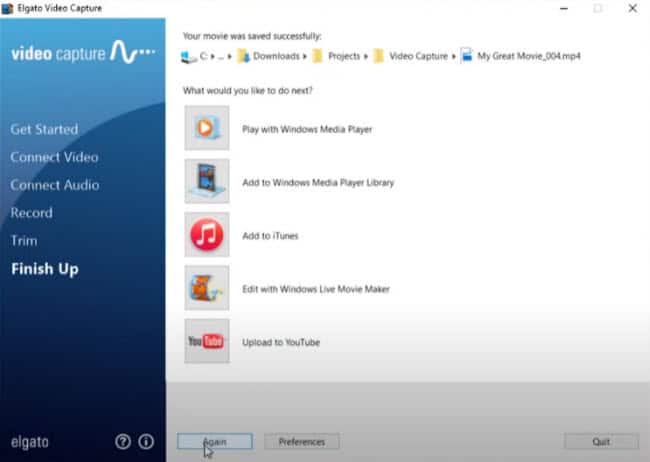
- You can save the video, play it on Windows Media Player, edit it with Windows Movie Maker or iMovie, add it to iTunes or upload it to Youtube.
- If you have another tape to convert, click on the “Again” button. It will take you to begin a new process.
- Else, click on the “Quit” button to complete the process.
The software will show you where the converted videotape was saved. So, you can easily find the converted video on your PC.
Alternative device: VIDBOX VHS to DVD Deluxe.
2. DIGITNOW Video to Digital Converter
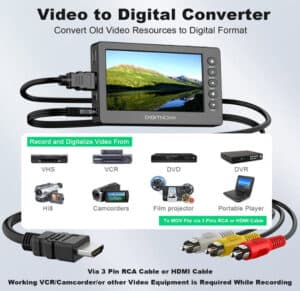
The DIGITNOW Video to Digital Converter’s USP is that it presents a wider range of methods to convert (capture) and playback the captured video. Considerably, it comes with its inner screen, thus, you can see it on the device directly. No computer is needed!
The device has a built-in large-capacity battery (1800 mAh) and this device is lightweight, hence letting you set up and convert the videotapes and playback anywhere you like. The device can be charged using the adapter or connected to a PC using a USB cable.
Moreover, you can also play the footage on your TV utilizing your AV or HDMI cable. You can even record the footage onto your memory card. Also, you can video transfer it to your PC using the given USB cable.
Features Highlight
- Support: Transfer video from VCRs, VHS tapes, Hi8, Camcorder, DVD, TV BOX & Gaming systems
- Interface: USB 2.0 HDMI, AV
- Compatible with: Windows and macOS X
- Output: HDMI, AV, 5” OLED, and Speaker
- Includes: HD Video Capture device, 5V Power Adapter, HDMI Cable, Type-C USB Cable, AV Cable, User Manual, and SD card.
- No computer is required. Records directly to your USB flash disk or SD card. Also, it has a built-in LCD screen for quick playback.
- Wide compatibility with AV and HDMI input.
- Support HD 1080p recording.
- No SCART or S-Video included.
- Little complicated to setup and uses the device.
How To Use DIGITNOW Video to Digital Converter?
Before we started to use the device, make sure you already connected the DigitNow device to your VCR correctly using the RCA cable (included). Also, make sure you fully charged the internal battery of the device (using the provided power adapter or through computer a USB cable).
For more details on the setting up, you can watch the following video:
Here is how to record videotape from the VCR with the included RCA cable of DIGITNOW Video to Digital Converter:
For movie recording and playback, follow the steps here:
- Insert the provided SD memory card to the DIGITNOW video to digital converter.
- Turn on the DIGITNOW device by pressing the On/Off button.
- Also, turn on and hit the “Play” button on your VCR with the VHS tape that is ready to play. You will see the movie is playing on the DIGITNOW device.

4. Press the “PREV” button on the device and thus it will start the recording.
5. After the recording has been completed, just press the “Stop” button on your VCR to stop the recording.
6. You can watch the recorded video directly on the screen with the “PREV” button.
7. You also can transfer the digitalized file to your PC using the USB cable (included).
8. After that, you can either save it on your computer in digital format for playback on your smartphone or you can even burn it to a DVD disc.
Note: You also can use the same step to record the DVD using the VCR. Alternatively, you can use DVD ripping software to rip the DVDs.
You can also connect the device to a TV receiver using an AV cable (included) or by utilizing an HDMI cable (included).
Where Can I Convert VHS to DVD?
In case you aren’t tech-savvy and would love to avoid any technical aspect of converting the VHS tapes to DVD format, let somebody else do it for an affordable price for you. Yes, there are several VHS tapes to DVD format converting services available from where you can seek help.
For this, you simply have to send the VHS tapes to the service provider and then pick up your converted DVD from them. Many popular and big retail companies are into these sorts of services with various features and offers.
Method III: Transfer VHS to DVD Service Near Me
Based on your budget and requirements you can go for one of the following best VHS to DVD converting service providers near you. Listed below are the top 3 best and most popular service providers used to convert VHS to DVD format.
1. iMemories.com
This’s a website to recycle VHS to DVD format service that offers formats of VHS-C, VHS, 8mm tape, 8mm film, MiniDV, Betamax, Super 8, 16mm film, etc. The pricing of iMemories is $14.99 per tape or $14.99 per 50 ft of movie films. This is the discounted price by using the coupon code: SAVE50.
At iMemories, they understand how vital your memories are. That is why they digitize your old movie films, photos, and video tapes. Here are the formats offered by iMemories.
- Movie Films – 8mm, 16mm, and Super 8
- Videotapes – Betamax, VHS, VHS-C, Hi8, 8mm, MiniDV, Digital 8, and MicroMini
- Photo slides and Negatives
- MiniDVD and DVDs
Official site: https://www.imemories.com/
2. Costco
This’s one more service to convert VHS to DVD digital files. Available formats contain VHS, VHS-C, S-VHS, 8mm videotape, Super 8, MiniDV, 8mm film, foreign (PAL) to NTSC DVDs, and Betamax.
The pricing of transferring the VHS to DVD begins at $20 for one tape in any length of recording. If you convert it to USB, the price is $24.99 for the first tape (any length) and $16.99 for each additional tape.
The good news is that Costco not only do videotape converting, but they also supports film, photos, and slides. The following are the supported formats.
Accepted Formats:
- Videotapes: S-VHS and VHS, Beta, Hi-8, VHS-C, 8 mm, MiniDV, Digital 8, MiniDV and
- Movie Film: Super 8, 16 mm, and 8 mm
- Photo Print: 2 x 2 inches up to 8 x 12 inches
- Slide: 35 mm, Super 35 mm, 110, 126, 127, 127 Superslide, 120/220 medium format.
- Digital Media: memory cards, Smartphones, USB drives, etc. (Warehouse only)
Official site: https://www.costcodvd.com/
3. Sam’s Club
Keep all your old photos and memories with Sam’s Club VHS tapes Service. This service lets you transfer vintage movie film reels, videotapes, slides and photographs, and analog media onto a blank DVD as well as a private online account for storage.
How it works:
- You need to fill out the order form online.
- Package your content in a shipping box together with the printout of the Shipping Document.
- Affix the prepaid labels, and then drop them off at the nearest location
- You’ll be informed as soon as your order is ready and on its way
- Receive the original media as well as DVD transfer copies
Official site: https://www.samsclubdvd.com/
Transfer VHS Tapes to DVD: Pricing Comparison Table
The following are the pricing comparison for converting various types of media & photos. Please note that the prices are good as of the time of updating this article.
iMemories Pricing:
- DIGITAL FILE DOWNLOAD: You can download all your digitized memories of yours for FREE!
- USB THUMB DRIVE: The memories provided on a USB drive begins at $39.99 (for 8 GB).
- CUSTOMIZED DVDs: A customized DVD of the memories is available for $19.99/DVD.
- MEMORIES CLOUD: $7.99/month or $49.99/year.
Costco Pricing:
- DVD: For the first tape is $19.99, and any length of extra tape is $19.99 each
- USB: For the first tape is $24.99, and any length of extra tape is $16.99 each
- DVD + USB: For the first tape is $29.99, and any length of extra tape is $22.99 each
Sam’s Club Pricing:
Video
- USB: For 2 hrs from up to TWO tapes is available at $22.85 ($30.46)
- DVD: For 2 hrs from up to TWO tapes is available at $17.15 ($22.86)
Film
- USB: For the initial 100 ft $22.85 ($30.46) and $0.14 $0.18 per ft after initial 100 ft
- DVD: For the initial 100 ft $17.15 ($22.86) and $0.14 $0.18 per ft after the initial 100 ft
Photo
- USB: For the initial 40 images $22.85 ($30.46) and after first 40 images, $0.33 ($0.44) per image
- DVD: For the initial 40 images $17.15 ($22.86) and after the first 40 images, $0.33 ($0.44) per image
Digital Media
- USB: For 90 min from 1 device is $22.85 ($30.46)
- Blu-ray: For 90 min from 1 device is $20.90 ($27.86)
- DVD: For 90 min from 1 device is $17.15 ($22.86)
Bottom Line
There are 2 things you should have on hand in case you’re trying to digitalize your VHS yourself –
- Sufficient time, and
- A VHS recorder or device.
Most of us do not own VHS players anymore. Thus, you’ll have to rent or buy one for the task. The actual conversion procedure can be time-consuming as you need to play out the VHS tapes in real time to record their footage for you. So, for instance, in case you’ve got a 4-hour videotape, you’ll need 4 hours to completely record it and covert it.
Also, you have to factor in the tape’s real recording mode – SP (standard play) LP (long play), or EP (extended play). In the case of EP or LP mode, the VHS is going to take 2 or 3 times as long to convert vs the standard 2 or 3 hours.
However, taking help from a professional service provider to convert the VHS to digital format is truly one of the best as well as most convenient options. They can manage cut-out blank footage, stabilize images, remove tracking errors, and also organize the whole movie into different chapters with useful titles.
Since editing videos can be an unmanageable practice, outsourcing it will certainly save you extra effort and time. You can even specify the format (MP4 or MOV) as well as a storage medium (USB flash drive, DVD) in which you wish to have your digitized content provided to you.
Considering every angle, hiring a professional conversion service provider for this job seems like setting aside some of your fixed budget for this project, but it is worth the money!