This site is reader-supported. When you buy via links on our site, we may earn an affiliate commission at no extra cost to you.
MacX DVD Ripper Pro is a powerful software designed to rip all kinds of DVDs into digital formats. With its great features and some settings, you can get access and enjoy your DVD content on computer & portable devices conveniently.
In this article, we will guide you through using MacX DVD Ripper Pro, from downloading and installing the software, a step-by-step ripping process to preserve the original DVD quality on the output files.
As usual, before you use any desktop software, you need to download the installation file and install it on your Mac system. But before we really go to download it, it’s better to know the software system requirements:
Supported macOS: Mac OS X 10.6 or later.
A DVD drive (either internal or USB will do).
To Download the Installation File
You can click on the button below (which will download from the official site, macxdvd.com) to download it. You will be downloading macx-dvd-ripper-setup.dmg (about 55 MB).
Installing the program is easy on Mac. Just double-click on the downloaded .dmg file and open it. A finder window appears, and drag the “MacX DVD Ripper Pro icon” to the “Applications” folder and it’s done. The software was installed.
Note: For easy access, you can drag the MacX DVD Ripper Pro to the Dock.
Part II: Buy MacX DVD Ripper Pro License
The installation file that you downloaded is for a free trial and this version has some limitations. To unlock the full potential of this MacX DVD Ripper Pro software, you need to buy the software’s full license.
The limitations of the trial version includes:
Rip 5 minutes of a DVD for evaluation purposes.
Some advanced features are disabled.
No free update of the software.
Hence, you should consider upgrading and there are many reasons for that. In fact, our editors rated this as the best dvd ripper for Mac in the market now.
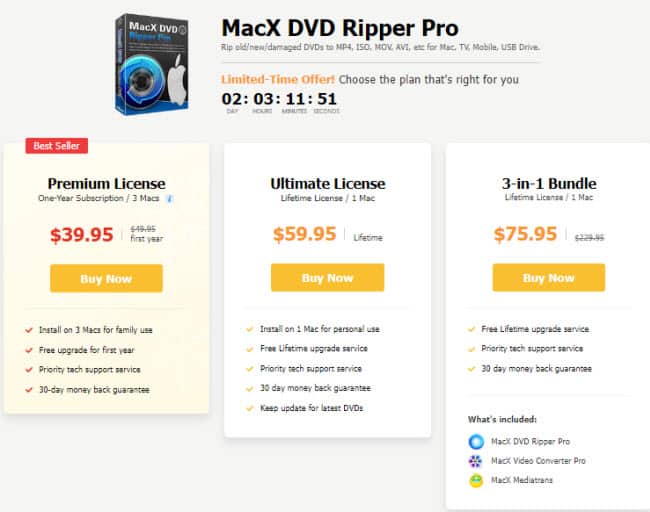
2. Click on the “Buy Now” button under the intended plan to purchase. As you can see, there are 3 plans available and we encourage you to get the lifetime license as it’s worth getting the software. Anyway, you can choose from any one of the options here:
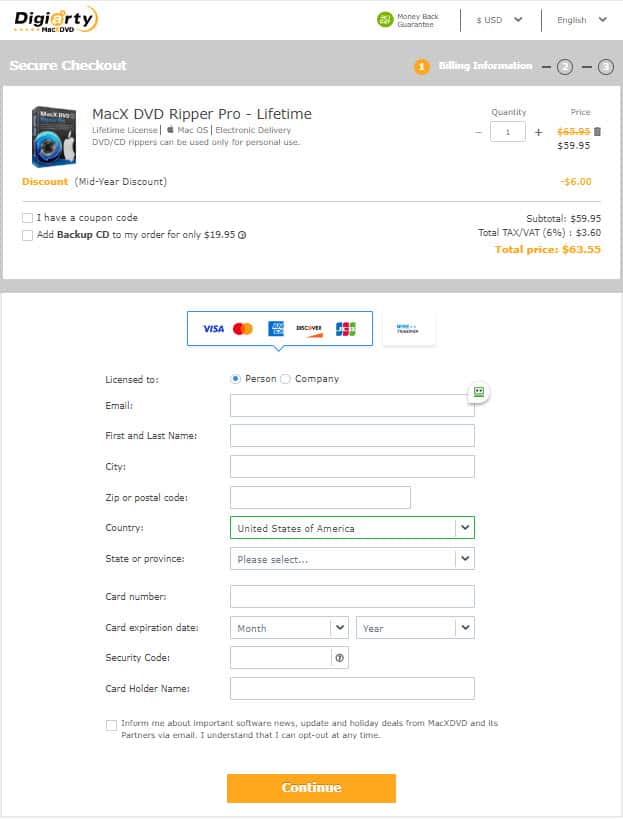
3. You will be redirected to the merchant site (2Checkout) and you need to fill in the payment details before making the payment.
4. Please fill up your personal info and credit card details before clicking on the Continue button to proceed with the payment. In some countries, you can use PayPal to make payments.
5. Once you successfully make the payment. You shall receive the product license code at the email address you provided.
Part III: Register and Activate the MacX DVD Ripper Pro
1. Launch the MacX DVD Ripper Pro software. At the top of the initial screen, click on the “Register” option. This will pop up a new window as follow:
2. In the “Email:” and “License Code:” columns, enter the email address you use to purchase the software and the license code that you received after purchasing the software.
3. Click on the “Activate” button. You should receive another dialog box stating “Register Successfully!” and you can click on the “OK” button to close it.
4. This also means that you already successfully activated the software and you can enjoy all the great features of MacX DVD ripper pro software.
Part IV: How to Use MacX DVD Ripper Pro?
MacX DVD Ripper Pro can be used to rip or back up both homemade and commercial DVDs. It’s even can handle 99-title DVDs, Japanese DVDs, workout DVDs, adult DVDs, Disney movies, and more.
To Rip a DVD
We will guide you to use the software to rip a DVD and backup the DVD in this section. You just need to insert a DVD disc into the DVD drive and follow the steps below:
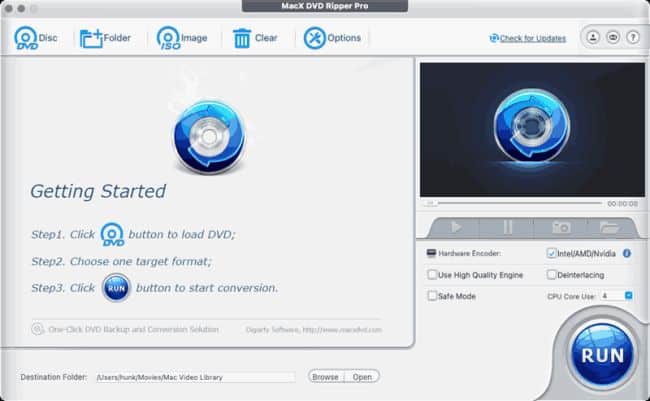
Step 1: Load the DVD
Launch the MacX DVD Ripper Pro. From the initial screen, click on the “DVD Disc” option and a small dialog box will pop up asking you to choose the DVD drive. Make sure the DVD drive is selected correctly and click on the “OK” button.
You also can choose the option “DVD Folder” or “ISO Image” to convert the DVDs.
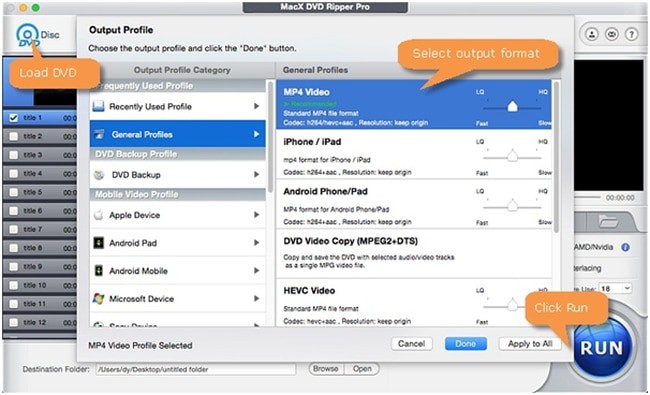
Step 2: Set the Output Format
You will see the following screen that allows you to choose the intended output format. For example, you can choose the “MP4 Video” under “General Profiles” because MP4 files can be played on almost all devices. When ready, click on the “Done” button.
You can choose the video format for specific devices like Apple iPhone, iPad, or Android devices like Samsung, HTC, Huawei, or Microsoft devices. The software has 350+ presets available.
Step 3: Set Destination Folder [Optional]
At the bottom of the screen, under the “Destination Folder” column, you can click on the “Browse” button to choose a new folder in your Mac to store the ripped files.
Some extra settings available on the main interface:
High Quality Engine – Choose this option for the better video quality on the output files.
Safe Mode – If you encounter problems somehow being unable to convert the DVDs, checking this option may solve the hassles.
Deinterlacing – If you are converting interleaving video, check this option for progressive scanning video with a much clearer image.
Step 4: Start to Convert the DVD
Click on the “RUN” button to start the ripping process on your Mac. You can see the ripping progress and after some time, the ripping will be complete.
To Backup a DVD
To backup, means to copy the entire disc without losing the output quality to your computer hard drive, or ISO Image, or to MKV format. You also can use the DVD copy software.
Follow the steps here:
Step 1: Insert a DVD disc to backup into the computer DVD drive and launch the MacX DVD Ripper Pro software.
Step 2: Click on the “DVD Disc” option and choose the correct DVD drive letter from the pop-up dialog box. Click on the “OK” button.
Step 3: From the “Output Profile” pop-up dialog box, choose “DVD Backup” under the “Output Profile Category”. There are 4 modes available, choose a backup type you prefer. You can choose the “Full Title Copy” option, and click the “Done” button.
Step 4: If needed, choose the “Destination Folder” and hit the “RUN” button to start the backup process.
Conclusion
MacX DVD Ripper Pro provides a simple yet powerful solution for backup & ripping DVDs and converting them into digital formats. Throughout this article, we have covered where to download, install and activate the software.
With MacX DVD Ripper Pro, you now have the ability to enjoy your DVD content on a wide range of devices and platforms. You also know how to preserve the original DVD quality at a faster speed.
I hope you can enjoy your favorite homemade or commercial DVD movies in the digital world with MacX DVD Ripper Pro now. Happy converting!