Last updated on April 6th, 2024
This site is reader-supported. When you buy via links on our site, we may earn an affiliate commission at no extra cost to you.
In today’s digital age, there are many different ways to store and share your data. However, sometimes you just need a physical copy of something – like a DVD. And luckily, burning a DVD on Windows 10 is a breeze!
Burning a DVD is a straightforward process. There’s no need to download any third-party software or tools. All you need is a blank DVD, some data to burn, and you’re good to go.
In this comprehensive guide, we’ll take a look at the types of DVDs you can burn and go over in detail the methods to take to burn a DVD on Windows 10. Therefore, without any further ado, let’s delve right in!
Types of CD & DVD Discs
To make sure that your DVD burns properly, it is crucial to understand the different types of discs and their uses. There are two main types of discs:
- DVD-R/CD-R [R stands for Recordable]
- DVD-RW/CD-RW [RW stands for Rewriteable]
Each type has its own unique benefits and drawbacks, so it is essential to choose the right one for your backup or disc-burning needs.
1. DVD-R/CD-R
These are the most common types of discs and are compatible with most DVD players and computers with a DVD drive. DVD-R discs can be recorded once and then played back on any DVD player or PC/Mac system. A standard DVD-R can hold up to 4.7 GB of data.
CD-R discs can be played on any CD player or computer with CD-ROM or DVD drive and they can only be recorded once. Once you write/burn to the disc (even 1%), the content cannot be erased. A normal CD-R can hold up to 700 MB of data.
Benefits:
- The DVD-R/CD-R discs are the most compatible with different media players and computer DVD drives.
- The discs are less expensive than other types of discs like DVD-RW.
- It’s easily available in many stores.
Drawbacks:
- The discs can only be recorded once. Once burned the data to it, you cannot erase the content, and no way for you to rewrite the data.
- Some data discs (not empty discs) have built-in copy-protection and regional lock; hence you need software like DVD Ripper to decrypt it.
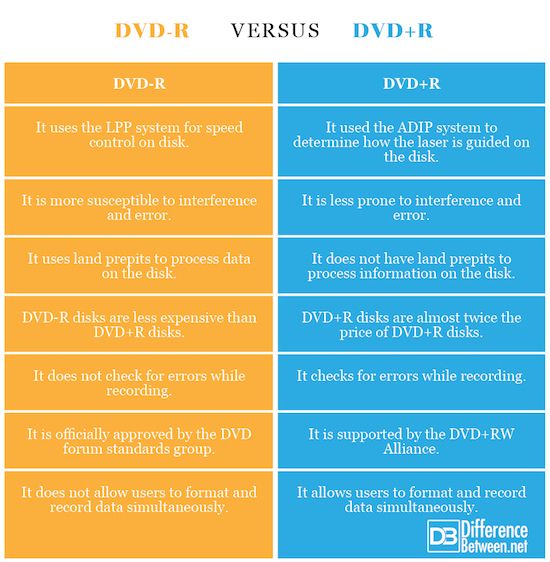
DVD-R Vs. DVD+R
On the other hand, there are some differences between DVD-R and DVD+R. Although both disc types are similar there are some differences as shown in the comparison chart below:
2. DVD-RW/CD-RW
These discs are less common than DVD-R/CD-R discs but are growing in popularity. DVD-RW discs can be recorded multiple times and erased. The DVD-RW disc capacity is also 4.7 GB. CD-RW discs can be played on most CD /DVD players or computers with a DVD drive.
Benefits:
- The DVD-RW/CD-RW discs can be recorded multiple times. You can write data to it and erase it repeatedly (with the burning software).
- The discs can save you money with their re-usability.
Drawbacks:
- The discs are slightly more expensive than other types of discs.
- The data discs can get damaged by several scratches.
So, you can use the DVD-R to burn the data for long-term backup. However, if you need to frequently write and erase the data to the DVD, then getting a DVD-RW is a better option. Next, we will show you how to burn a DVD on Windows 10/11 the easy way.
The Methods to Burn A DVD on Windows 10/11 Without a 3rd Party Software
There are two methods that you can use, one with a USB flash drive and the other one with a CD/DVD player. Let’s explore each method in more detail!
1. With a USB Flash Drive
USB flash drive is the easiest and most common method to burn a DVD on Windows 10/11. All you need is a USB flash drive with at least 4 GB of storage space and a DVD burner.
- To begin, insert a blank DVD-R/RW into your computer DVD/optical drive and plug the USB drive into your USB drive.
- If your computer AutoPlay is enabled, a small notification box appears to determine what Windows should do when a blank CD/DVD disc is inserted. If AutoPlay is not enabled, you can open the “File Explorer” window [keyboard shortcut: Win + E], and click the “This PC” on the left panel.
- Right-click on the DVD drive, and click on the “Open AutoPlay…”. From a new pop-up window, choose the “Burn files to disc” option. This will bring you to the following screen:
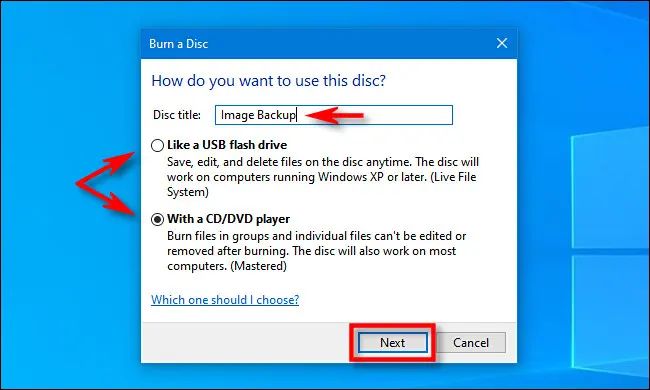
- In the “Disc Title:” option, you can give a name that you like i.e. Image Backup. Then, choose the “Like a USB flash drive” option and click the “Next” button to continue.
- Windows will format the flash drive and display it in File Explorer. Just directly copy and paste the files to burn to the DVD drive. The Windows will burn the files to the DVD disc that you inserted.
- Once the burning process is complete, you can eject your DVD and watch it on any DVD player or on PC/Mac systems.
Alternatively, you also can use DVD burning software, such as Nero Burning ROM to burn the discs.
2. With CD/DVD Player
If you don’t have a USB flash drive, you can also use a CD or DVD player to burn your DVDs. This method is a little more complicated than the previous one, but it’s still manageable.
- Follow the same steps in the previous section until you see the picture above, you can choose the “With a CD/DVD Player” option and click the “Next” button.
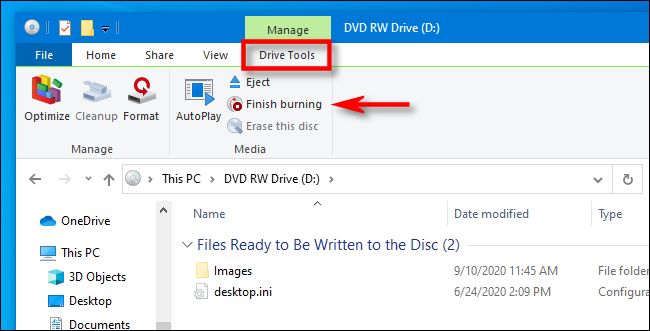
- The File Explorer window will open the DVD drive with the header “Files Ready to Be Written to the Disc”.
- You can copy and paste (or drag and drop) the files to burn to the Window (DVD drive).
- When ready to burn in the File Explorer window menu bar, select the “Drive Tools” and then click the “Finish burning” option.
- A “Burn to Disc” window will appear. Just give the “Disc title:” a name i.e. Image Backup, and choose the “Recording speed:”. You can choose the highest speed.
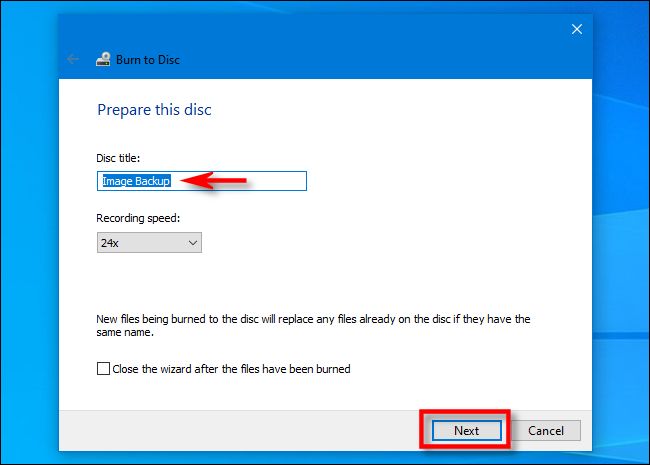
- Click the “Next” button to continue and the burning process will start and the screen also shows the estimated burning time.
- Once the burning process is complete, the disc will automatically eject from your DVD drive. Just click the “Finish” button to complete the process.
Both of these methods are easy to follow and only require a few steps. So, if you want to burn a DVD on your Windows computer, be sure to try out one of these methods!
Alternative: Use DVD Creator or DVD Burning Software
DVD burning software is another great alternative for burning DVDs. Most of the paid burning software has a variety of features, such as the ability to burn both data and audio CDs, as well as create ISO images.
In case you’re looking for an alternative to burning a DVD on Windows 10, you can try out Wondershare DVD Creator or Roxio Easy CD & DVD Burning. Both these programs are easy to use and allow you to carry out the process of burning quickly.
While both of this software are good choices, we would recommend Wondershare DVD Creator as it offers rich features and is more user-friendly. It also has a free trial version that you can use to test out the software before making a purchase.
Using Wondershare DVD Creator
Wondershare DVD Creator is a software that allows you to create DVDs from video or data files. It is available for both Windows and Mac. With this software, you can create DVDs from AVI, MP4, WMV, MOV, and other video formats.
Here are the steps you need to follow to burn a DVD using Wondershare DVD Creator:
- Download and install the software on your computer.
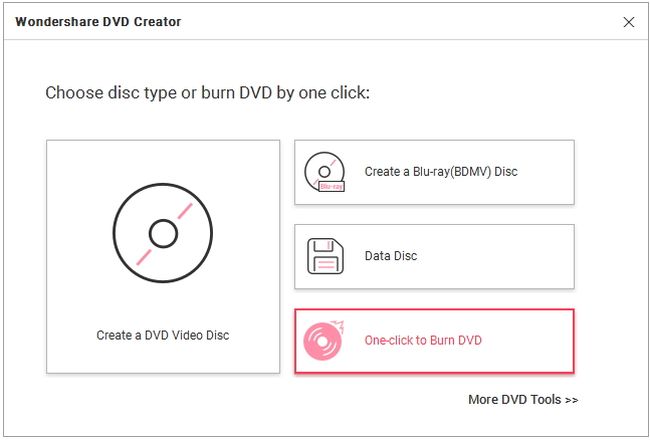
- Launch the software and click on the “One-click to Burn DVD” button.
- From the main interface of the software, click on the red + area to select the video or data files you want to burn from your computer.
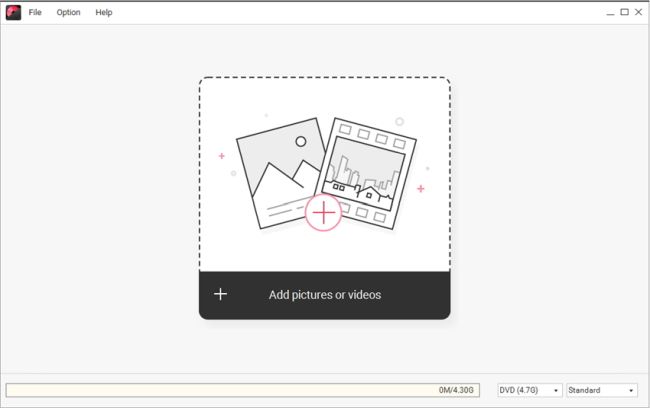
- You also can click the “Add title” button to add more files. Then, insert a black DVD disc and choose the “Burn to disc” option. You also can change other settings as needed.
- If needed, click the “Preview” button before clicking on the “Burn” button to start the process of burning the DVD.
That’s all you need to do! Once the process is complete, you will have a professionally burned DVD that you can watch on any standard DVD player. With just a few clicks, you can easily burn a DVD using this software.
Conclusion
Now that you know how to burn a DVD on Windows 10, you can easily make copies of your favorite movies and TV shows. You can use any of the methods mentioned in this article to get the job done.
So, whether you want to use a USB flash drive or CD/DVD Player or opt for an alternative program, the process is relatively simple. You can follow the steps outlined in this article to burn your DVDs without any issues.
Of course, there are many other programs that you can use to burn DVDs. But why don’t you try using the methods explained in this article as it’s free, and no extra software is needed!
Frequently Asked Questions (FAQs)
Q: Do I need to have a blank DVD to burn my video files?
A: Yes, you will need to have a blank DVD to burn your video files. You can either use a CD/DVD player or a USB flash drive to create the DVD.
Q: What format should my video files be in before burning them to a DVD?
A: The most compatible video format for DVD is MPEG-2.
Q: What is the best quality setting to use when burning a DVD?
A: The best quality setting to use when burning a DVD is the “DVD Quality” setting. This will ensure that your burned DVD has the best video and audio quality.
Q: How long does it take to burn a DVD?
A: The time it takes to burn a DVD can vary greatly depending on the size of the data you’re trying to burn, the speed of your computer’s DVD burner, and the quality setting you choose. For example, burning a 4.7GB movie at the highest quality setting will take about 45 minutes, while burning the same movie at a lower quality setting will take about 15 minutes.